Project managers make important decisions every day. But how can you be sure that the choices you’re making are the best ones for both your career and your company as a whole? The answer is found through decision tree analysis.
In this article, you’ll learn exactly what decision tree analysis is and why this exercise can benefit project managers. We’ll then show you a four-step system to make effective decision trees.
What’s a decision tree?
A decision tree is a diagram that clearly defines potential outcomes for related choices.
In project management, a decision tree analysis exercise allows project leaders to easily compare different courses of action against each other and evaluate the risks, probabilities of success, and potential benefits associated with each.
A proper decision tree has four main elements:
- Decision nodes: A decision node, represented on our decision tree diagram as a square, indicates a choice that needs to be made.
- Chance nodes: A circle represents a chance node and is used to signify uncertain outcomes. These nodes are used when future results are not guaranteed.
- End nodes: End nodes represent the end of a diagram and illustrate an outcome.
- Branches: They connect the nodes. Each branch represents a potential choice and should be clearly labeled.
Generally, a decision tree analysis exercise begins with a single decision node, known as a square. From there, branches are drawn, representing various choices and resulting in potential outcomes (i.e., chance nodes).
When the full potential scenario has been played out, an end node is used to signify the outcome. As you’ll see later in this article, a completed decision tree analysis graph looks like a tree, hence the name.
The benefits of doing decision tree analysis
As a project manager, every decision presents new threats and fresh opportunities. The decision tree analysis technique lets you better prepare for each eventuality and make the most informed choices for each stage of your projects.
There are other benefits as well:
- Clarity: Decision trees are straightforward to understand and follow. When structured correctly, each choice and resulting potential outcome flow logically into each other.
- Efficiency: Building off the last point, because decision trees present information in such a straightforward way, they can be quickly analyzed and used to make crucial decisions.
- Adaptability: Decision trees can easily accommodate new ideas and/or opportunities. This means that your tree can grow alongside your projects.
- Compatibility: The decision tree analysis technique can be used with other project management methodologies, allowing you complete flexibility as you manage your projects.
Let’s show you how to use this decision-making strategy.
How to use a decision tree in project management
These are the four steps to take and use decision trees effectively.
1. Identify your options
Every project has multiple roads to completion. Your initial job is to recognize each of them so that you can add them to your decision tree and make the best choices about which to take and when.
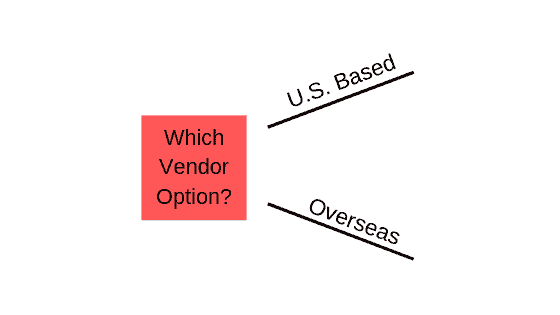
For example, Mary owns a fabric manufacturing plant in Los Angeles, California. Though they’ve only been in business for a few years, they’re growing rapidly, and Mary needs to find a larger vendor from which to source materials. She identifies two legitimate options: a U.S.-based company that sits just a few hours away from Mary’s plant and a vendor that operates overseas.
2. Forecast potential outcomes for each option
Now, you need to make predictions, best guesses, and estimations — some of which could prove inaccurate. But that’s okay! This exercise identifies the option with the highest probability of success.
Returning to our previous example, Mary must now decide whether to partner with a U.S.-based or overseas vendor. Both options present their fair share of risks and rewards. So, Mary begins crafting a decision tree to make the right choice. It looks like this:
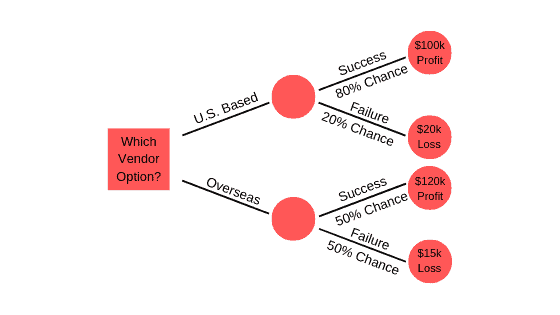
Now, Mary needs to add potential outcomes for each choice to accurately predict which materials vendor will best suit her growing company’s needs and budget.
On the one hand, the U.S.-based vendor will allow her to visit more often in person and check up on operations. But it’s also the more expensive option.
On the other hand, overseas vendors are much cheaper, and Mary could use the money saved to improve other areas of her business. But there are downsides, too. Mary won’t be able to make as many trips to see this vendor, there will be a language barrier, and shipping times will be longer.
What’s the best option? Mary considers every bit of information she can get and estimates the probability of success for both paths. She then adds these details to her decision tree to help her make the best choice possible. Her tree now looks like this:
Mary can now move on to step three and analyze her decision tree to determine which vendor is her best option.
3. Thoroughly analyze every potential result
At this point, you should have a full decision tree made. Congratulations! This is a big first step, but the hard work is just getting started. Now you need to analyze each potential result and assess which option will be the best fit for your unique project. If you’re working with monetary amounts, you can use the expected value (EV) formula.
Expected value is found by multiplying a potential outcome by the likelihood that it will occur. For example, you anticipate that your project will earn your company $1,000 and has a 50% chance of success. Your EV score is 500.
Let’s get back to Mary and her search for the right vendor. Based on her research, she predicts that working with a U.S.-based vendor has an 80% chance of success and will produce a profit of $100,000. Using the formula described above, Mary gets an EV score of 80,000.
But she also needs to run the calculations for failure. So Mary multiplies $20,000 by 20% and ends up with 4,000. Finally, she needs to subtract the failure score from the success score to get her total EV of $76,000 for the U.S.-based vendor.
Mary goes through the same process for the overseas vendor and realizes that her EV, should she go that route, amounts to a score of $52,500. Based on EV alone, Mary’s best option is to work with the U.S.-based vendor.
While EV scores aren’t everything, they will help you make a more qualified decision.
4. Optimize your actions accordingly
The final step is to optimize your actions. Once you know which option provides the greatest chance of success for your project and the one that presents the greatest value, you can confidently make project decisions.
In Mary’s case, she decided to go with the U.S.-based vendor. Not only did that vendor score a higher EV, but it also represents only $5,000 more in losses should the relationship fail. Those two things, plus the fact that Mary can visit the vendor regularly and they both speak the same language, made it a very clear choice for her.
Decision tree analysis tools
Before we let you go, we want to quickly review the tools you can use to illustrate your different project options.
- Pen and paper: You can easily create your entire tree using a good old-fashioned pen and paper. This approach is incredibly practical and cost-effective.
- Whiteboard: A step up from pen and paper is the office whiteboard. We prefer this option because it’s very easy to fix mistakes. Use your eraser and start again.
- Sticky notes: Speaking of starting again, sticky notes are another great option and can be used on any surface — a piece of paper, a whiteboard, or even a wall in your office.
- Decision tree software: Lastly, there are different software options if you feel like building a digital tree. This route is great because your diagram will stay neat and tidy and can easily be sent to colleagues. It also doesn’t take up room in your office. A few great software tools for this purpose include LucidChart and SmartDraw.
- Microsoft Excel: Just in case you want to use software to complete your decision tree analysis exercise but don’t want to pay for or learn how to use a new tool, just fire up Microsoft Excel.
- In the “A” column, insert the main choice you need to make. This is your decision node.
- Then in column “B”, add potential actions in a diagonal direction from your decision node.
- Column “C” will tally the consequences of the actions stated in column “B”.
- This process will continue until you’ve reached the end of your decision tree analysis exercise.
Make better choices for your projects with the decision tree analysis strategy
Decision tree analysis is important for project managers, but it’s also useful for anyone who needs to make data-backed decisions. It will help you evaluate every option and choose the ones with the highest probability of success. Just remember to follow our four-step system:
- Identify your options: Before making an informed decision, you must be aware of every potential project path.
- Forecast potential cutcomes for each option: What do you see happening were you to pursue each project option before you?
- Thoroughly analyze each potential result: Once your decision tree is made, you need to analyze it and determine your best course of action.
- Optimize your actions accordingly: The only thing left to do is to optimize your actions for success. You now know which option is ideal for your project. Pursue it!