Google Sheets is a free, flexible, and online alternative to planner apps that you can use to organize and manage your schedule. Want to know how? Keep reading to learn how to make a schedule and daily planner in Google Sheets.
Here’s what’s in the article:
Ready to get started? Let’s dive in.
How to make a weekly schedule in Google Sheets
Here’s a simple three-step process to create a weekly planner in Google Sheets.
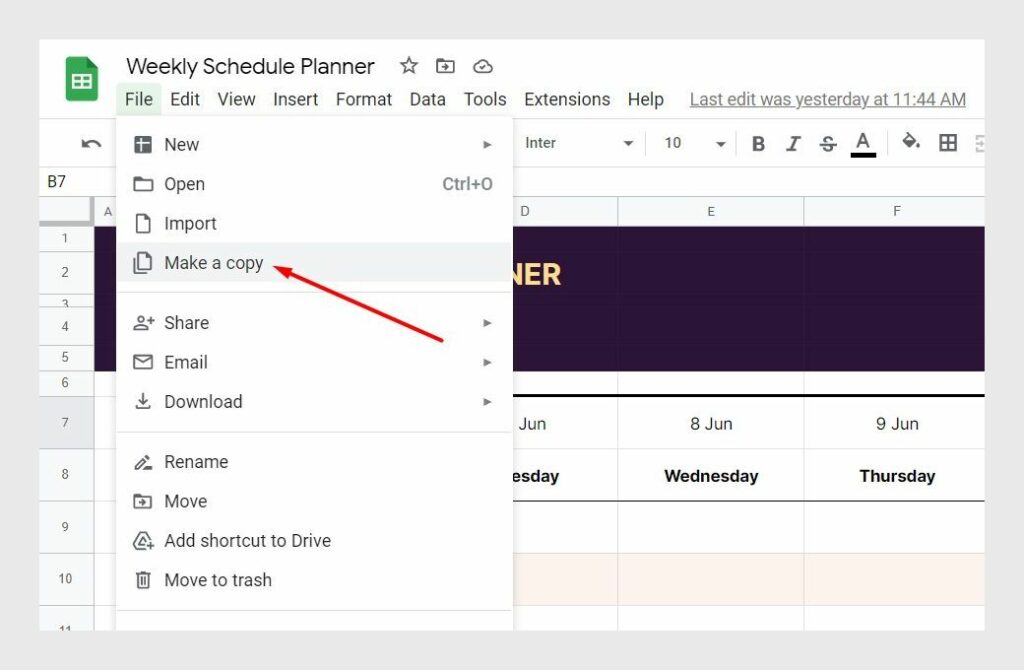
Step 1: Make a copy of the free Google Sheets Weekly Schedule template.
To make a copy:
- Click to open the Weekly Schedule Planner template.
- Go to File → Make a copy to save the template to your Google Drive.
Step 2: Familiarize yourself with the schedule template

You’ll notice that this weekly planner has the following features:
- Space to organize your schedule for an entire week
- Undated planner with a customizable week start date
- 30-minute slots to plan your day in detail
- Space to add notes and to-do items at the end
- Automatic light-green background for scheduled events
Step 3: Customize the weekly schedule start date
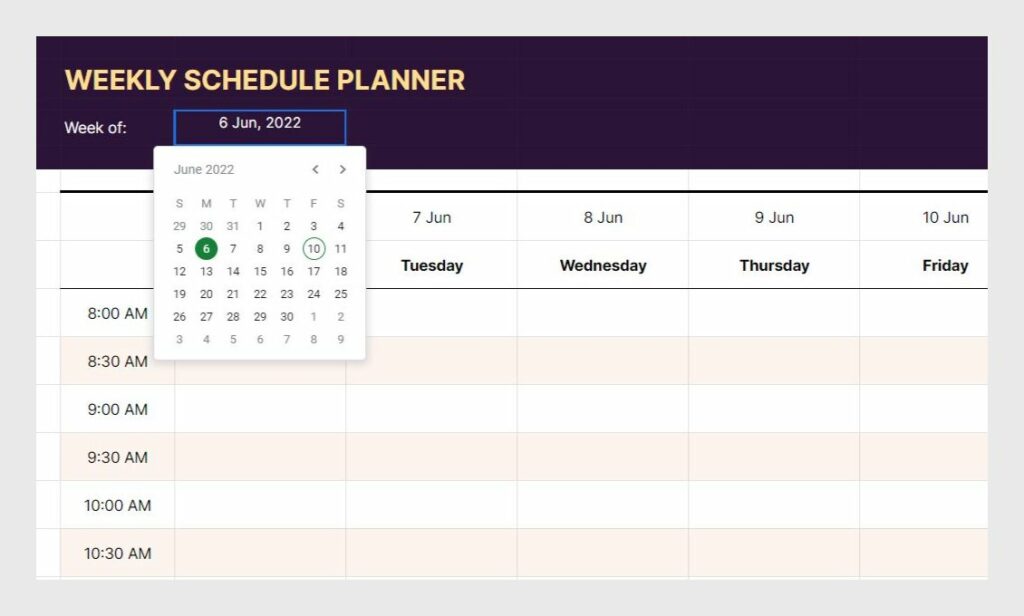
You’ll notice that you can customize the week start date in cell “C4” of the Google Sheet. Changing this date automatically adjusts the dates and days in rows 7 and 8.
To customize the week start date:
- Double-click on the “C4” cell.
- On the calendar popup, select the date from which you want the week to start.
Alternatively, you can type in the date in cell “C4” in your local format.
With this feature, you can choose if you want your week to start on a Sunday, Monday, or any other day of the week.
How to make a monthly schedule in Google Sheets?
The steps to create a monthly schedule are very similar to those above. However, you need a different template for a monthly planner.
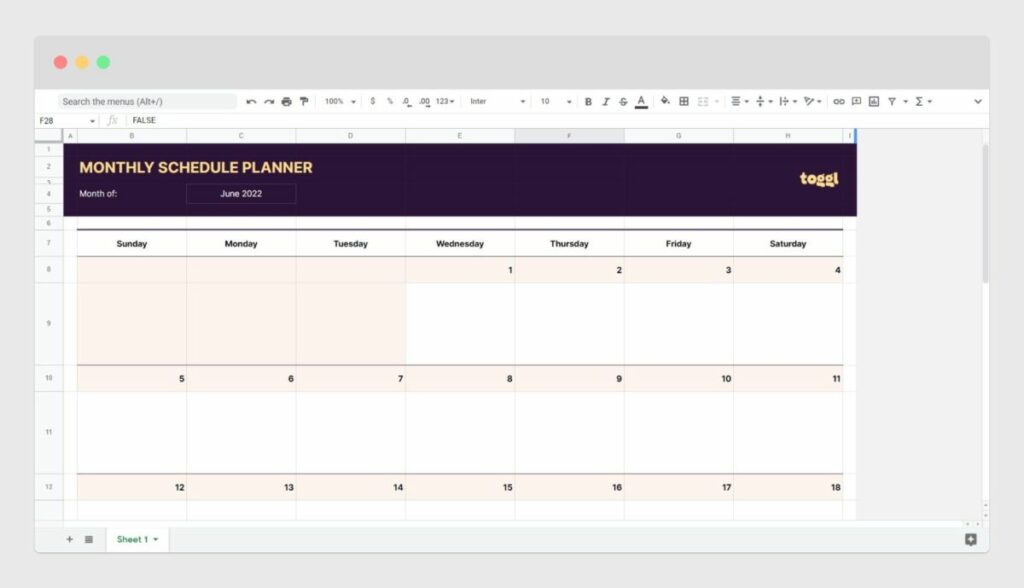
Step 1: Make a copy of the Google Sheets Monthly Schedule Template
To make a copy:
- Click to open the Monthly Schedule Planner template.
- Go to File → Make a copy to save the template to your Google Drive.
Step 2: Familiarize yourself with the monthly planner
It comes with the following features:
- Space to organize an entire month’s schedule
- Space to add notes and to-do items
- Undated calendar with customizable month
Step 3: Customize the monthly schedule planner
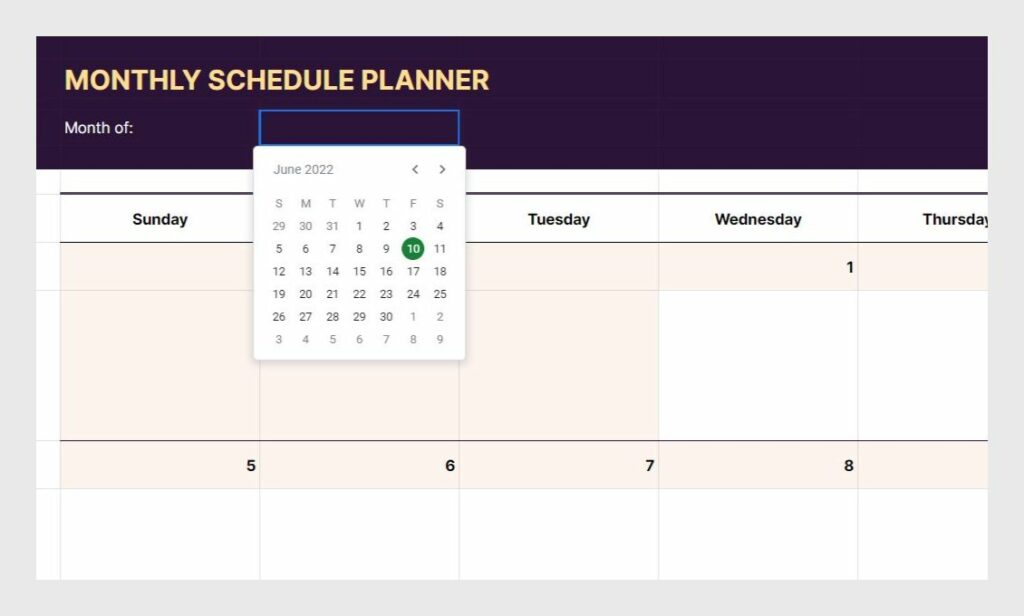
You can change the month in cell “C4”. When you change the month, it automatically changes the days and the dates for the month below.
To customize the month:
- Double-click on the “C4” cell.
- On the calendar popup, select any date from the month for which you want to create a planner.
Alternatively, you can type in the first date of a month in cell “C4” in your local format.
Tips to improve your Google Sheets scheduling experience
Google Sheets comes with powerful features. Here are three tips to improve your scheduling and planning experience.
Tip 1: Create schedules for more than a week or month
You can easily create schedules for multiple weeks (or months) by duplicating the sheet “Sheet 1” in your Google Sheets spreadsheet.
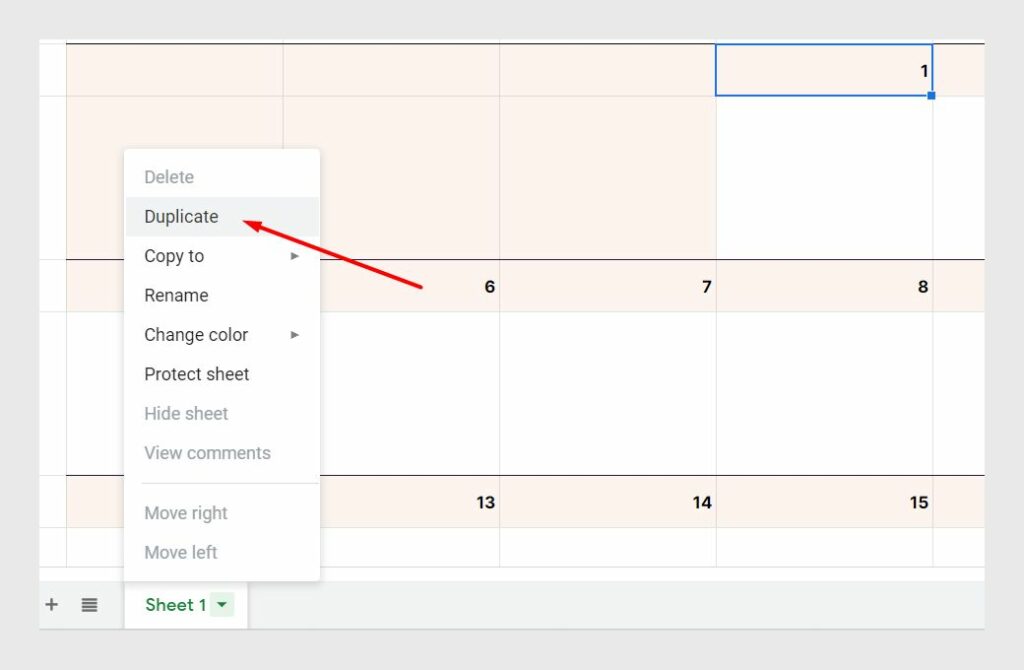
To duplicate a sheet:
- Click on the dropdown arrow next to the sheet’s name.
- Then click “Duplicate”
To make more sense of your weeks, you can also rename the sheet to a suitable name.
Tip 2: Freeze rows to improve efficiency
Freezing a row lets you see it continuously on the screen even when you scroll to the bottom of the sheet.
In the week or month planner, freezing the Day rows will save you the mental energy to figure out which day of the week or month you’re looking at. Plus, you don’t have to scroll up and down constantly to look up a specific date or day.
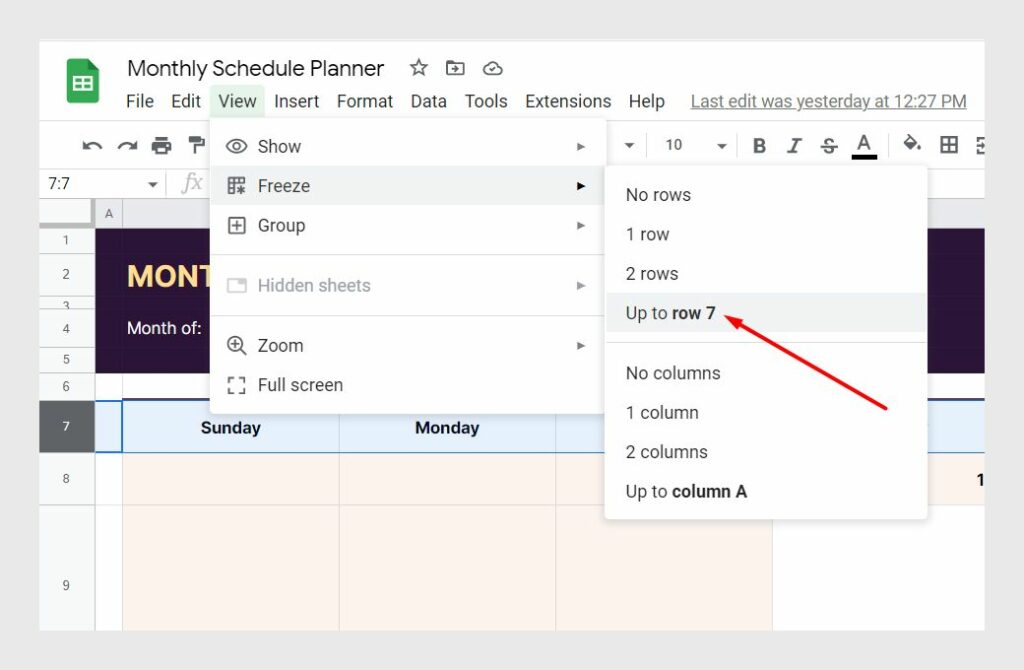
To freeze date and day rows:
- Select rows 7 and 8 in the weekly planner or row 7 in the monthly schedule planner.
- Then click on “View → Freeze → Up to row 4” in the spreadsheet menu to freeze the rows.
Tip 3: Make your schedule available offline
There are times when you may have to access your schedule spreadsheet without an internet connection.
All you need is the Google Docs Offline extension (along with the Chrome browser).
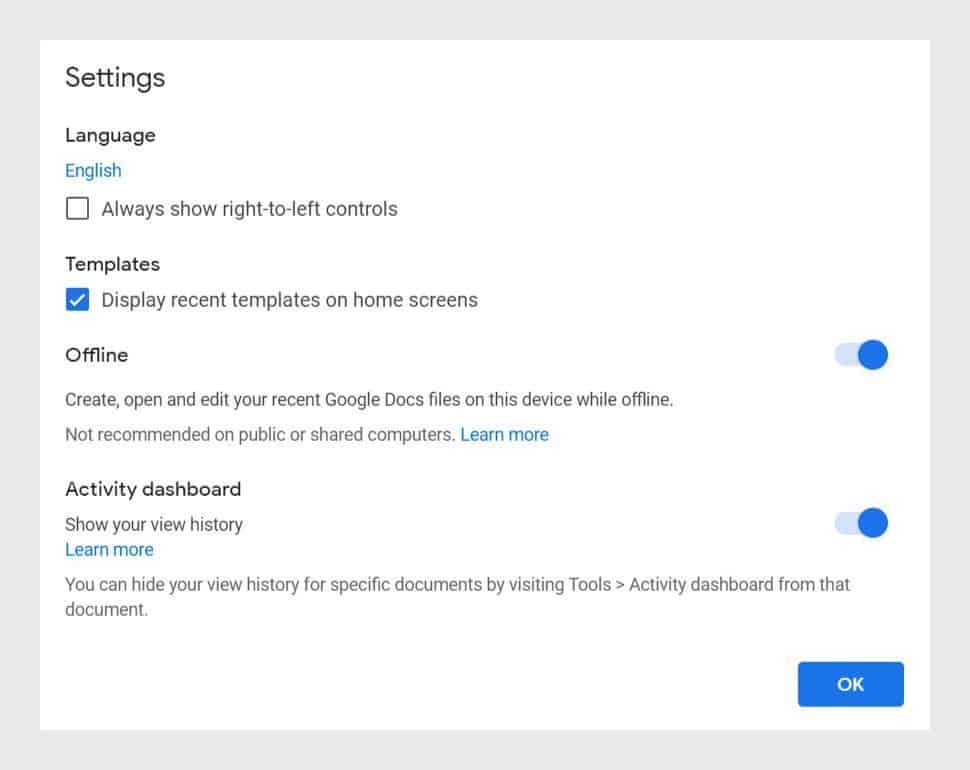
Once you’ve installed the extension, here’s how you can enable offline mode for all your Google documents:
- Go to docs.google.com
- Click on the hamburger menu icon before the logo, then click on “Settings”
- Finally, enable the offline mode
Now you can access your schedule even with limited internet.
Pros and cons of a Google Sheets schedule
Google Sheets can be a powerful yet cost-effective way to make and manage your schedule. It comes with the following advantages:
- It’s free: Google Sheets comes free with your Gmail (or Google Workspace) account. You can save some money spent on a scheduling tool.
- Everyone knows how to use a spreadsheet: It’s simple. So you don’t have to spend time learning a new tool.
- Easy to share and collaborate: Share your daily schedule with your team. Let them add comments or notes.
Disadvantages include:
- Team schedules are a nightmare: Managing and coordinating plans with your team, across multiple spreadsheets can be a challenge.
- Limited details: You can only include so much information in a spreadsheet cell. You can’t attach a file or document.
- Missing long-term view: With Google Sheets, you can plan for a week or a month in advance. But what if you need a bird’s-eye view over the next six months or a year?
If these drawbacks affect your work efficiency, you may want to consider using other tools to manage your (and your team’s) schedule.
Google Sheets alternatives for managing schedules
From free calendars to simple timeline tools you have a lot of options for managing schedules.
Calendars are great for capturing, organizing, and managing personal events. However, for managing your entire team’s event schedules and tasks you need a bit more.
Toggl Plan—a simple work scheduling and tracking tool for teams—can help.
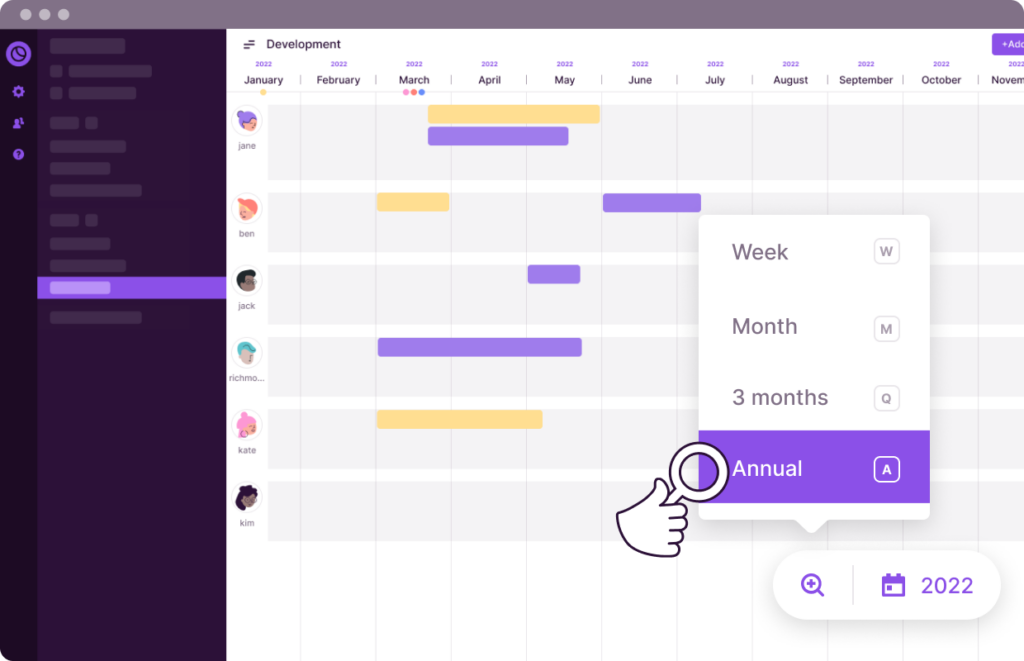
To plan your week, month, or even a year create a Plan timeline. Then click on the timeline to create a task. Change the tasks’ schedule with simple drag and drop. Or drag the tasks’ ends on the timeline.
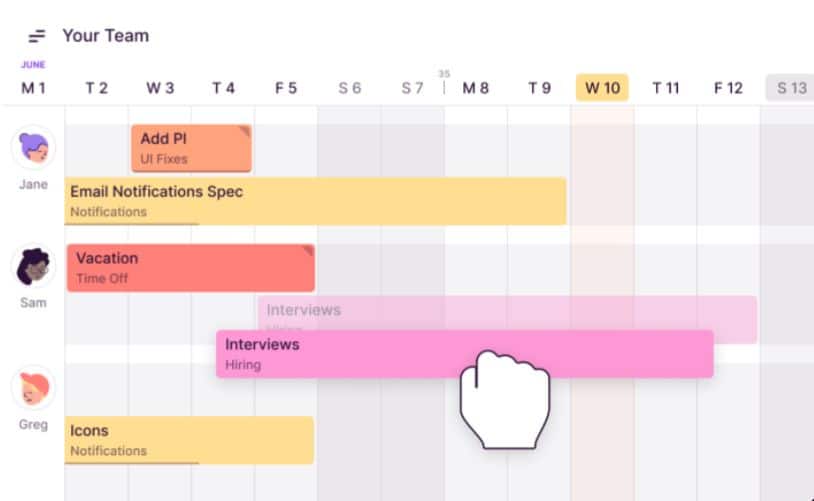
With Toggl Plan you can create unlimited Plan timelines and add unlimited color-coded milestones. To get a clear overview of your schedule zoom in on a week’s schedule or zoom out to a month, quarter, or year.
Next, assign tasks to team members (or yourself). Add task details, attach files, or include a task checklist to improve the task-completion quality. You can also schedule the tasks for a specific time.
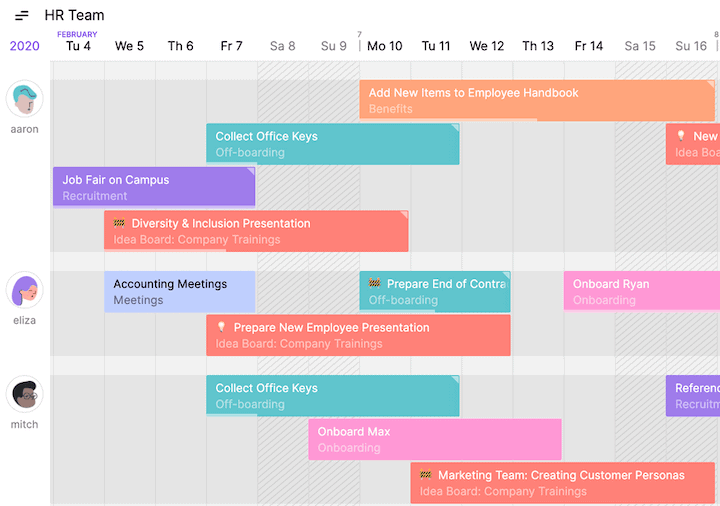
Finally, you can also visualize your team’s schedule with the Team timeline. This helps you detect any scheduling conflicts and team members overwhelmed with work.
Pricing
- Free forever for solo users.
- Team plan: $9 /user/month. Team timelines, recurring tasks, in-app and email notifications.
- Business plan: $15 /user/month. Guest users, single sign-on, data export.
Try Toggl Plan for free. No credit card required.

Jitesh is an SEO and content specialist. He manages content projects at Toggl and loves sharing actionable tips to deliver projects profitably.