There are countless tasks to tackle every day — at home and at work.
To-do lists and checklists simplify this by providing a clear, organized way to manage your tasks. Whether planning a project, managing daily tasks, or buying groceries, a checklist ensures nothing is overlooked.
Excel checklists offer significant advantages over traditional paper ones. They are interactive checklists and easy to edit, share, and access from multiple devices, making them ideal for personal and professional use. Plus, using a checklist template in Excel can save you time and ensure consistency across your team.
In this article, you will learn:
- How to make a checklist in Excel
- Where to find free Excel checklist templates
- Pros and cons of Excel checklists
Let’s dive into making your Excel checklist.
Note: We have detailed intrusctions on building checklists in Google Docs if you prefer using that. You can also learn how to build checklists in Word.
How to create a checklist in Excel
A custom-made Excel checklist can be a powerful employee productivity tool. Follow the simple steps below to create a checklist that matches your team’s workflow.
Step 1: Setting up your Excel sheet
Creating an Excel checklist begins with setting up your workbook. Here’s how to get started:
Open a new Excel workbook:
Launch Excel and open a new workbook by selecting “File” > “New” > “Blank Workbook.” This will give you a fresh canvas to start building your checklist.
Format columns and rows:
Decide on the layout of your checklist. Typically, you’ll want at least two columns: one for the checkbox and one for the task description. You might also include additional due dates, priority, or note columns.
Resize columns to fit your content. You can adjust column widths by clicking and dragging the boundary on the right side of the column heading.
Naming your checklist sheet:
It’s a good practice to name your sheet, mainly if your workbook contains multiple sheets.
To rename a sheet, double-click the tab at the bottom and type in a descriptive name, such as “To-Do List” or “Project Checklist.”
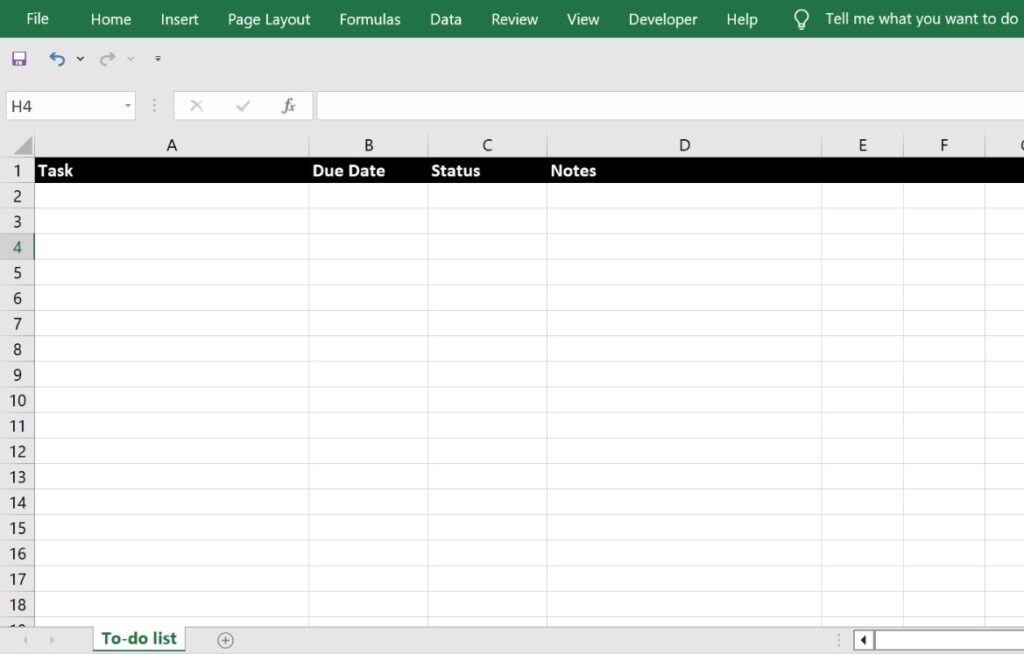
Add headers:
Include headers at the top of your columns to organize your checklist.
For example, use “Task,” “Due Date,” and “Status” as headers.
You can format these headers by bolding the text or adding a background color to distinguish them from the rest of the data.
Save your workbook:
Save your work to avoid losing any progress.
Go to “File” > “Save As” and choose a location and file name. It’s helpful to save frequently as you continue building your checklist.
With your Excel sheet adequately set up, you can add the items to your checklist. This step ensures your checklist is organized and easy to use.
Step 2: Adding checklist items
Now that your Excel sheet is set up, it’s time to add the items to your checklist.
Here’s how to do it:
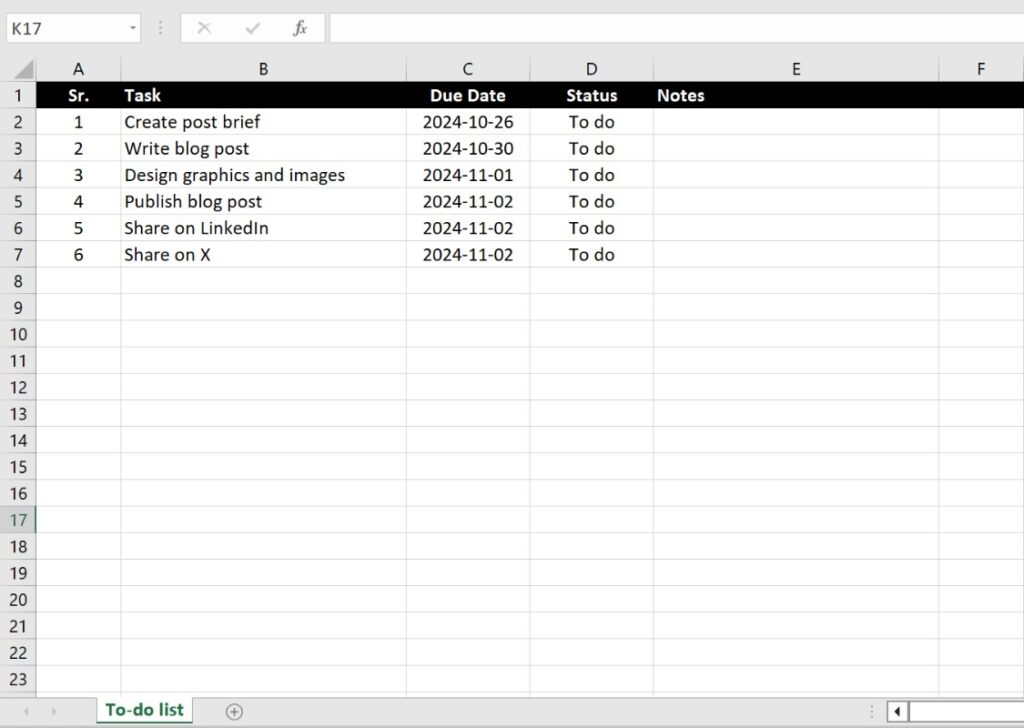
Input checklist items:
In the first column, list the tasks you want to include in your checklist.
Simply click on a cell or use the cell selection button and start typing. Each row should contain a separate task.
Use bullet points or numbers for clarity:
While Excel doesn’t have built-in bullet points, you can manually add them by typing an asterisk (*) followed by a space before each task.
For numbering, simply enter the numbers in sequence in the adjacent cell next to your list of tasks.
Organize Items Logically:
Group related tasks together to make your checklist more intuitive.
For example, if you’re creating a project checklist, you might group tasks by phases or departments.
Consider adding subtasks to break down larger tasks into more manageable parts.
Indent these subtasks by adding spaces before the text or using a separate column to indicate the task hierarchy.
Include additional information:
If necessary, add columns for other task details.
For example, you can label columns “Due Date” or “Priority” and fill in the relevant information for each task.
This extra information can help you keep track of deadlines and prioritise your tasks effectively.
Format for readability:
Use Excel’s formatting and conditional formatting options to enhance the readability of your checklist.
For example, you can bold the task descriptions, use different font colors for high-priority items, or apply borders to separate checklist sections.
To format cells, select the cells you want to format, right-click, and choose the formatting options you need (e.g., “Bold,” “Font Color,” “Borders”).
With your checklist items added and organized, you’re ready to move on to creating interactive checkboxes to track task completion.
Step 3: Creating checkboxes
Checkboxes make your basic checklist actionable.
Adding checkboxes makes it an interactive checklist. As a result, it’s easy to track completed tasks. Follow these steps to create checkbox cells:
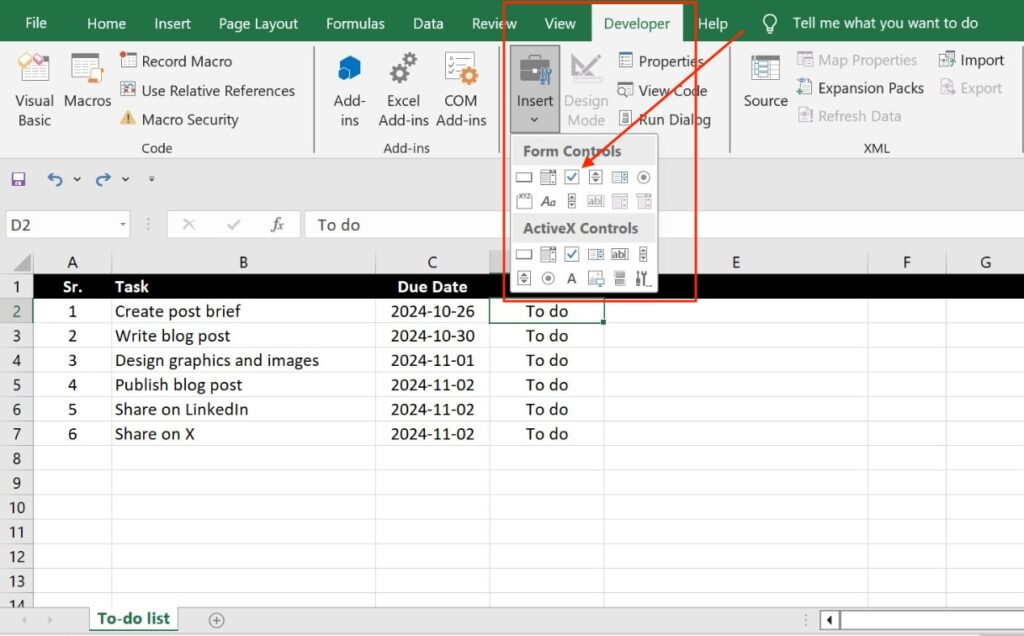
Enable the Developer Tab:
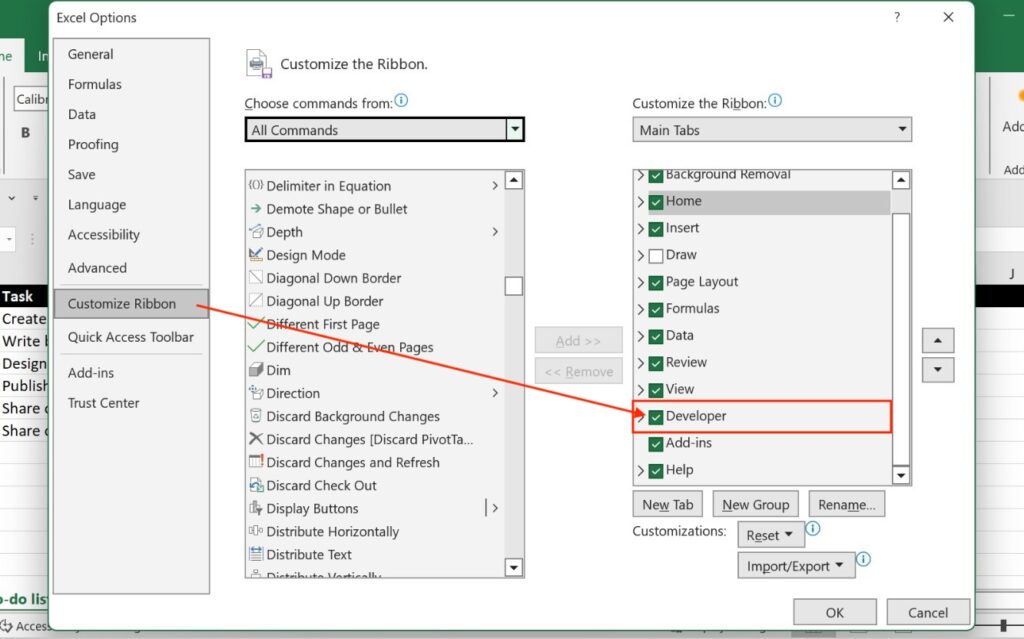
The Developer dialog box in Excel provides access to advanced features, including checkboxes. To enable it, go to “File” > “Options” > “Customize Ribbon.” In the right pane, check the box next to “Developer” and click “OK.” You’ll now see the Developer box in the Excel ribbon.
Insert checkboxes:
Click on the Developer tab, and in the “Controls” group, click “Insert.” Under “Form Controls,” select the checkbox icon. Your cursor will change to a crosshair.
Click on the cell where you want to insert the checkbox object. This will place a checkbox in that cell. You can drag the checkbox to reposition it within the cell.
Resize and align checkboxes:
To resize a checkbox, right-click on it and select “Edit Text” to remove the default text label.
Then, right-click again and choose “Format Control.” In the “Size” tab, adjust the height and width as needed.
Align the checkboxes by selecting them, right-clicking, and choosing “Align” from the context menu. Use the alignment options to make sure all checkboxes are uniformly positioned.
Link checkboxes to cells:
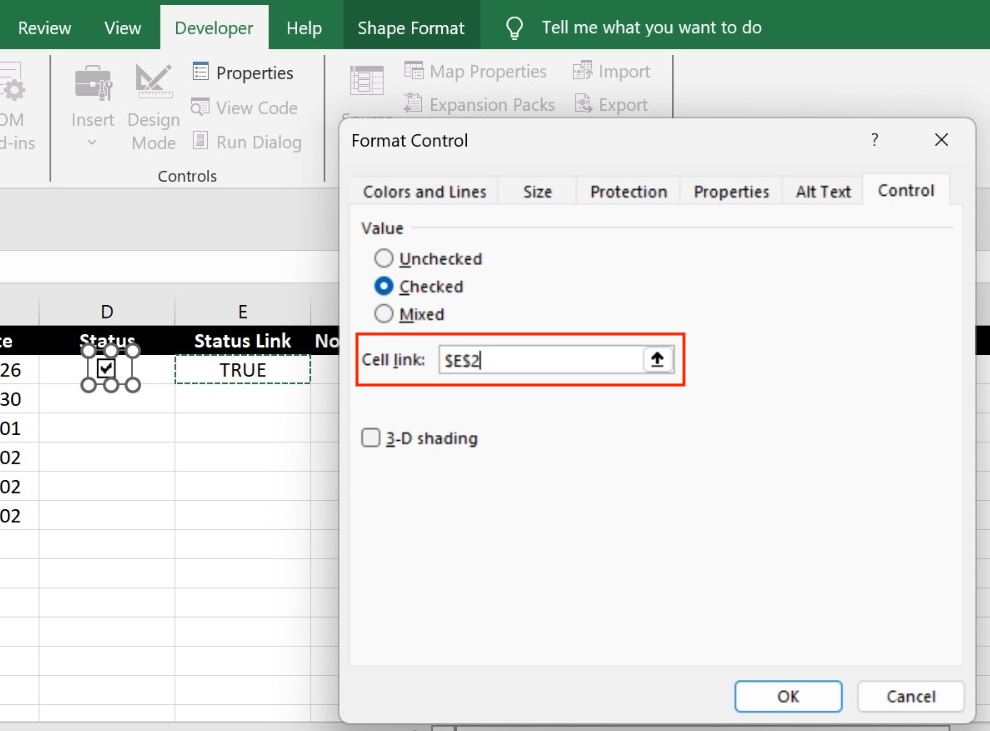
Link the checkboxes to cells to make them functional. Right-click on a checkbox, select “Format Control,” and go to the “Control” tab.
In the “Cell link” box, enter the cell reference where you want the checkbox value (TRUE/FALSE) to appear. Click “OK.”
Repeat this process for each checkbox. The linked cells will display TRUE when the checkbox is checked and FALSE when unchecked.
Copy and paste checkboxes:
You can copy and paste to quickly add checkboxes to multiple rows. Select a cell with a checkbox, press “Ctrl + C” to copy, select the range of cells where you want to paste the checkbox control, and press “Ctrl + V.”
Ensure each checkbox control is correctly linked to its corresponding cell.
Next, we’ll improve the checklist with conditional formatting to distinguish completed tasks visually.
Step 4: Conditional formatting for completed tasks
Conditional formatting in Excel allows you to visually distinguish completed tasks, making your checklist more dynamic and easy to read.
Here’s how to apply conditional formatting to your checklist:
Select the range of cells:
First, select the cell range containing the TRUE/FALSE values linked to your checkboxes. This range will be used to apply the conditional formatting rules.
Open conditional formatting:
Go to the “Home” tab on the ribbon, and in the “Styles” group, click on “Conditional Formatting.”
Then, from the dropdown menu, select “New Rule.”
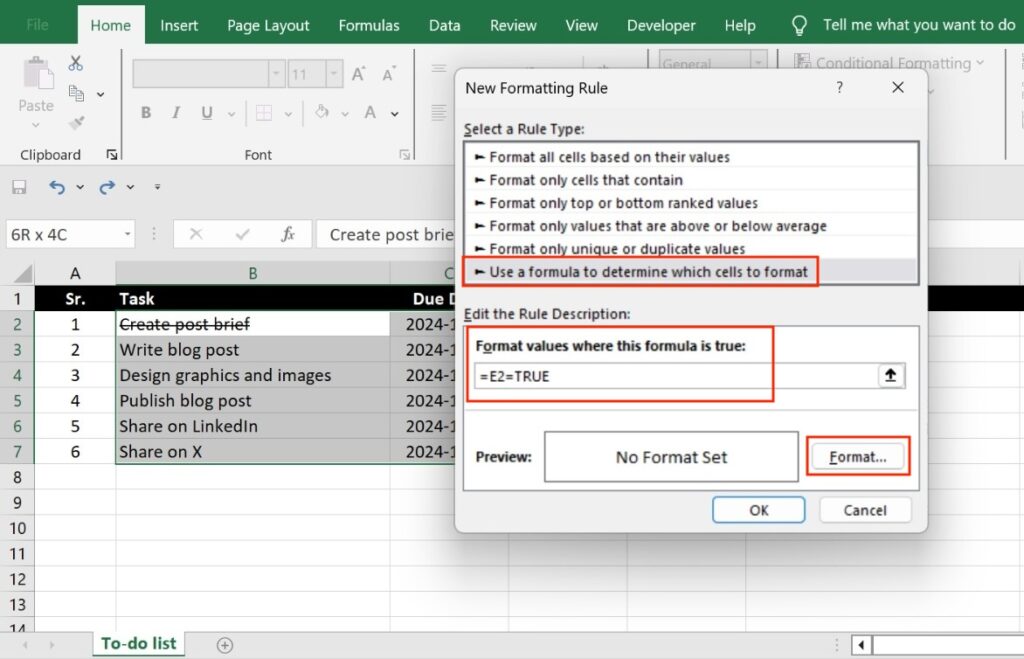
Create a new formatting rule:
In the “New Formatting Rule” dialog box, choose “Use a formula to determine which cells to format.” This option allows you to set a custom formula for conditional formatting.
Enter the formula:
In the “Format values where this formula is true” box, enter the formula referencing the first cell in your selected range. For example, if your TRUE/FALSE values start in cell E2, you would enter =E2=TRUE. This formula checks if the value in the cell is TRUE.
Format the cells:
Click the “Format” button to specify the formatting you want to apply when the formula is true.
Standard formatting options for completed tasks include strikethrough text, a different font color, or a fill color. Choose the desired formatting options and click “OK.”
Apply the rule:
After setting the format, click “OK” in the “New Formatting Rule” dialog box to apply the rule.
The conditional formatting will now be applied to the selected range, and completed individual checklist items (those with a TRUE value) will be visually distinct.
Using conditional formatting enhances the visual appeal of your checklist and helps you quickly identify completed and pending tasks.
Step 5: Advanced features (optional)
You can further enhance your Excel checklist with advanced features to make it more functional and efficient.
Here are some advanced options to consider:
Data validation with dropdown menus:
Adding dropdown menus to your checklist can help standardize entries and reduce errors.
To create a dropdown, select the cell where you want the dropdown to appear. Go to the “Data” tab and click “Data Validation.” In the “Settings” tab, choose “List” from the “Allow” dropdown menu.
In the “Source” field, enter the list of options separated by commas (e.g., “High, Medium, Low”) or select a range of cells containing the options. Click “OK.”
Creating dependent checklists:
Dependent checklists allow you to create a hierarchy of tasks. For example, selecting a category in one column filters the options available in the next column.
To set this up, first create named ranges for each set of dependent options. Select the range, go to the “Formulas” tab, click “Define Name,” and enter a name for the range. Use data validation to create the dependent dropdowns.
In the “Data Validation” settings for the dependent column, use the formula =INDIRECT(A2) (where A2 is the cell with the primary category) in the “Source” field.
Using formulas to tally completed tasks:
Excel formulas can automatically tally completed tasks, providing a quick overview of your progress.
To count the number of completed tasks, use the COUNTIF function. For example, if your TRUE/FALSE values are in column E, you can use =COUNTIF(E2:E100, TRUE) to count the number of TRUE values.
Similarly, you can calculate the percentage of tasks completed with =COUNTIF(E2:E100, TRUE) / COUNTA(E2:E100) * 100.
Conditional formatting for task prioritization:
Enhance your checklist by applying conditional formatting based on priority levels. Select the range containing your priority values, then go to “Conditional Formatting” > “New Rule.”
Choose “Format cells based on their values” and set the rules for different priority levels. For example, you might use red for “High,” yellow for “Medium,” and green for “Low.”
Automate repeating tasks with macros:
If you have repetitive tasks, consider using macros to automate them. Go to the “Developer” tab and click “Record Macro.”
Perform the actions you want to automate, then stop recording. Assign the macro to a button for easy access.
By integrating these advanced features, you can transform a simple checklist into a powerful tool for managing tasks and projects more effectively.
Step 6: Saving and sharing your checklist
Once you have created and customized your Excel checklist, saving and sharing it effectively is important to ensure you and your employees can collaborate on it as needed.
Here are the steps to do so:
Save your checklist:
To save your checklist, go to “File” > “Save As.” Choose a location on your computer or cloud storage, such as OneDrive, and give your file a descriptive name. Click “Save” to store your checklist.
Saving for different purposes:
- Regular save: Use the regular save option to update your checklist as you make changes. Remember to save frequently to avoid losing any data.
- Save as template: If you plan to reuse the checklist structure, you can save it as a template. Go to “File” > “Save As,” and in the “Save as type” dropdown, select “Excel Template (*.xltx).” This will allow you to use the same format for future checklists without starting from scratch.
Sharing Options within Excel:
- Email: To share your checklist via email, go to “File” > “Share” > “Email,” and choose “Send as Attachment.” This will open a new email with your checklist attached.
- Share workbook: To collaborate, you can enable workbook sharing. Go to “Review” > “Share Workbook,” and check the box that allows changes by more than one user. Then, save the workbook to a shared location accessible by your collaborators.
- Excel Online: If you want real-time collaboration, consider using Excel Online. Save your file to OneDrive, then go to “File” > “Share” > “Share with People.” Enter the email addresses of the people you want to collaborate with and set the appropriate permissions.
- Exporting as a PDF: If you need a static version of your checklist (for example, a grocery list) that can be easily shared and printed, export it as a PDF. Go to “File” > “Export” > “Create PDF/XPS.” Choose a location to save the PDF, and click “Publish.”
Tips for collaboration with Excel checklists:
- Comments: Encourage collaborators to use the “Comments” feature for feedback and discussion. Right-click on a cell and select “Insert Comment” to add a note.
- Track changes: Enable “Track Changes” to record modifications made by different users. Go to “Review” > “Track Changes” > “Highlight Changes.”
By following these steps, you can ensure your checklist is saved securely and shared effectively, facilitating collaboration and enhancing productivity.
Free checklist templates for Excel
Excel offers a variety of free checklist templates that cater to different needs, such as project management, daily task lists, event planning, and more.
These templates are pre-formatted and ready to use, allowing you to focus on inputting your specific tasks.
Free checklist templates can save you time and provide a solid foundation for creating custom checklists.
How to find and download checklist templates
From Excel
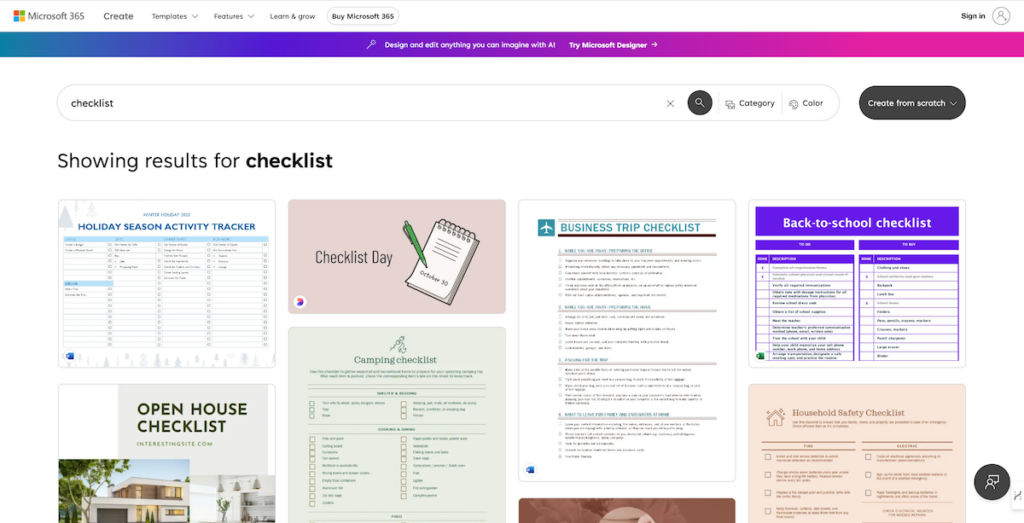
- Open Excel and go to “File” > “New.”
- In the search bar, type “checklist” to see a range of available templates.
- Browse the options and click on a template to preview it.
- Once you find one that suits your needs, click “Create” to download and open it.
Other Online resources
Numerous websites offer free Excel checklist templates.
Websites like Vertex42, Spreadsheet123, and Microsoft’s official template gallery are excellent sources. Visit these sites, search for “checklist templates,” and download the templates that meet your requirements.
Tips for customizing templates
Modify existing columns and rows
Adjust the existing template to better fit your needs by adding, removing, or renaming columns and rows.
For example, if the template includes a “Due Date” column but you need a “Priority” column, simply change the header.
Add your tasks
Replace the placeholder tasks in the template with your tasks. Ensure that the tasks are detailed and specific to provide clarity and completeness.
Apply your formatting and colors
Customize the template’s appearance by applying your preferred fonts, colors, and styles to list items.
You can use Excel’s formatting tools to ensure the checklist aligns with your personal or organizational branding.
Integrate advanced features
Integrate some of the advanced features discussed earlier to enhance the template, such as checkboxes, conditional formatting, and data validation.
Examples of popular checklist templates
- To-do list templates: Simple templates for daily or weekly task management.
- Project management checklists: Templates that help track project milestones, tasks, and deadlines.
- Event planning checklists: Templates designed for planning events, including task tracking, budget management, and timelines.
These free templates can streamline the process of creating your checklists and ensure you start with a professionally designed structure. Customize them to fit your needs and enjoy a more efficient way to manage your tasks.
Pros and cons of Excel checklists
Excel checklists offer numerous benefits, but they also come with some limitations.
Understanding these pros and cons can help you decide if Excel is the right tool for your checklist needs.
Advantages of Excel checklists
- Flexibility and customization: Create tailored checklists with adjustable layouts and various formatting options.
- Integration with other Excel features: Utilize Excel functions like formulas, conditional formatting, and data validation.
- Ease of use: User-friendly and familiar to many, reducing the learning curve.
- Collaboration and sharing: Shareable with features like shared workbooks, Excel Online, and commenting for team collaboration.
- Portability: Accessible on multiple devices, allowing updates on the go.
Disadvantages of Excel checklists
- Complexity for large projects: Managing large, interdependent tasks can become cumbersome.
- Limited automation: Basic automation capabilities compared to specialized task management tools.
- Version control issues: It is difficult to manage the latest version when multiple users make changes simultaneously.
- Potential for errors: Manual data entry can lead to unnoticed errors in complex checklists.
- Performance limitations: Large files with extensive data and formulas can slow down performance.
Conclusion
Excel is a powerful organizational tool for everything from checklists to complex financial tracking, project timelines, and much more.
We’ve walked through setting up your sheet, adding items, creating interactive checkboxes, and using advanced features like conditional formatting.
For a more comprehensive solution, try Toggl Focus. It offers simple project and task management features and allows you to track time against your tasks.
Sign up for a free Toggl Focus account.

Elizabeth is an experienced entrepreneur, writer, and content marketer. She has nine years of experience helping grow businesses, including two of her own, and shares Toggl's mission of challenging traditional beliefs about what building a successful business looks like.