The bulk of project management challenges stem from uncertainties that crop up from time to time. In such situations, the project management calendar constantly tells you what’s happening today, this week, month, quarter, or year.
Creating a project calendar can feel overwhelming. To plan a project schedule, you need to consider many factors — priorities, constraints, and risks.
Plus, it can be frustrating to adjust your calendar as things change.
But it doesn’t end here. Often project teams work with shared resources or other teams. You will also have to consider the other team’s schedule.
If this sounds familiar, this article is for you. It’ll help you overcome the chaos and show you 3 ways to build a project calendar.
In this article, you’ll learn:
- What is a project calendar?
- Types of project management calendars
- Three ways to plan a project calendar
Let’s begin.
What is a Project Management Calendar?
A project management calendar helps you plan, organize, and execute a project’s tasks. Project calendars tell you:
- What are the tasks to complete?
- When are these scheduled to start and end?
- Who’s responsible?
- What are the critical milestones?
Everyone has access to the project calendar. And, everyone knows what needs to be done and by when. As a result, accountability improves across the team.
Project management calendars are straightforward for small, personal projects. As a result, you can get by using a pen and paper schedule.
However, for larger projects with more team members, you’ll need tools that make it easy to create, edit, and share the project calendar.
Types of Project Management Calendars
As a project manager, you’ll work with two types of calendars — project and resource calendars.
In addition, team members may also need a task calendar. Let’s look at what these mean:
Project Calendar
As we’ve discussed before, a project calendar provides a schedule for your project. It shows you the project’s tasks, deadlines, and responsible team members.
Project managers must consider the stakeholder’s needs, priorities, and constraints when creating a project calendar. Besides, managers also need to think of the availability and risks related to the project’s resources.
For example, a client may want the project done by a specific date. The client may be willing to prioritize particular needs over others to meet the deadline.
Learn how to make a project timeline and plan your project calendar in eight actionable steps.
On the team’s side, there’s a risk that a few critical resources are not available. Or that there could be a delay getting local government permits.
All factors that can affect the project’s schedule need to be considered when creating a project timeline calendar.
Resource Calendar
A resource calendar shows the availability of resources. These resources can be people or material resources.
It shows the dates when a resource is unavailable. Team members may be working on another project or may perhaps be on vacation. Another project may have reserved a material resource, or maybe the resource is down for maintenance.
Experienced project managers often combine resource and project calendars. This way, managers can get a clear overview to create or adjust project plans.
Task Calendar
A task calendar helps team members plan and execute specific tasks such as audits and other recurring tasks.
This calendar captures the subtasks and resources required to complete a task. This level of detail is often outside the scope of the project calendar.
A task calendar helps you manage such tasks.
How to Create a Project Calendar?
Before creating a project timeline, ensure that:
- The project scope is approved.
- Work phases are determined.
- And a task list is created.
Once your task list is ready, you have everything you need to create a project calendar. With modern software tools at your command, there are three ways to make one.
#1. How to use Excel to create a project calendar?
Microsoft Excel is a powerful tool. Plus, it’s already available to most project managers. And even if you don’t, other spreadsheet software programs (Google Sheets or Numbers on Mac) are equally useful.
In addition to calendars, you can also create Gantt charts in Excel and Google Sheets.
Project Calendar Templates
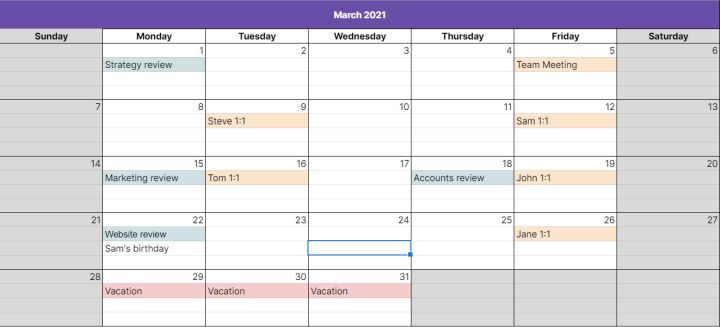
Excel’s grid design makes it easy to create your calendar. And if you’re in a hurry, there are a lot of project calendar template options available online.
Here are some project calendar templates for MS Excel:
Pros & cons of Excel Project Calendars
Familiarity, low learning curve, and templates make Excel a natural choice for most project managers. Also, since MS Office is available to most office goers, you don’t have to pay anything extra.
However, there are a few cases where Excel fails.
- Lack of access control: Once you’ve sent an Excel spreadsheet to someone, you cannot control who can access it.
- Poor collaboration: If multiple people work together on an Excel sheet, they’ll need to consolidate the changes often with others.
- No update notifications: With Excel, there’s no way to get notifications or know who’s changed what. That makes it very difficult to keep track of changes.
#2. How to create a project calendar using Google Calendar?
Google Calendar is a popular calendar application. Most of us use it every day to manage our schedule. Others use alternatives like Outlook Calendar and iCal, which provide very similar features.
Google Calendar is available for free with Gmail. And a better and secure version is also available via Google Workspace.
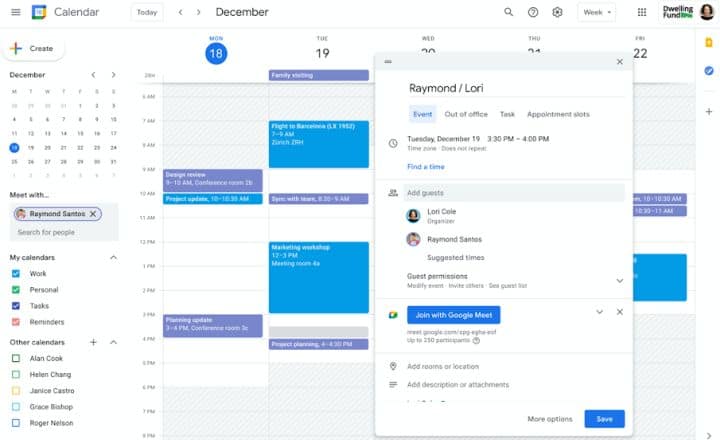
With Google Calendar, you can create a separate calendar for each team member, resource, or an entire project. Calendars are color-coded, and it’s possible to combine them with other calendars. These features help visualize resource availability.
Also, you can zoom in on a week or zoom out to a year. Plus, you can view the calendar as a timeline from the Agenda tab. Plus, calendar events are searchable, and you get email notifications if anything changes.
Pros and cons of Google Calendar
Google Calendar is available for free. Besides, it has all the features and integrations you’ll need to create a project calendar. Yet, most people use it only to schedule meetings.
Here’s why:
- Can’t manage complex projects: Google Calendar is a shared team calendar. It cannot handle complex projects. And if your team is large, things can quickly become disorganized.
- Too much work: Creating multiple calendars for each project and resource can become overwhelming.
- Can’t capture project information: With Google Calendar, there is no easy way to capture project data or track task status.
- Lack of collaboration: Again, you cannot add comments or attach files and documents to calendar events.
Here’s a useful article about how to use Google Calendar for project management.
#3. How to create a project calendar in Toggl Plan?
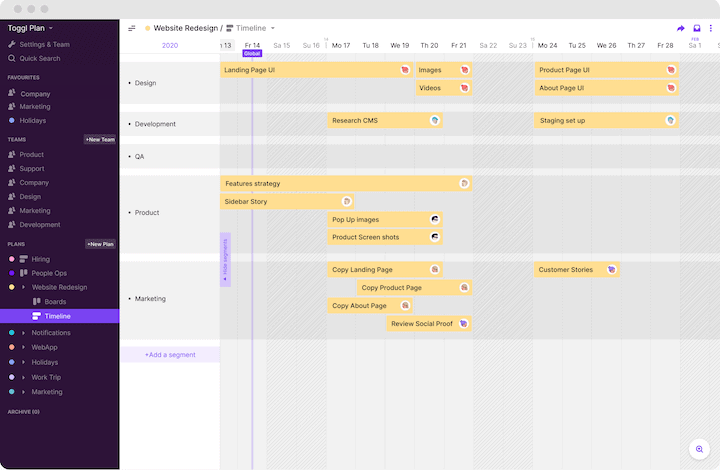
Finally, let’s look at using a project management app to create a project schedule. While there are many project management tools, we’ll look at using Toggl Plan to create a project calendar in this section.
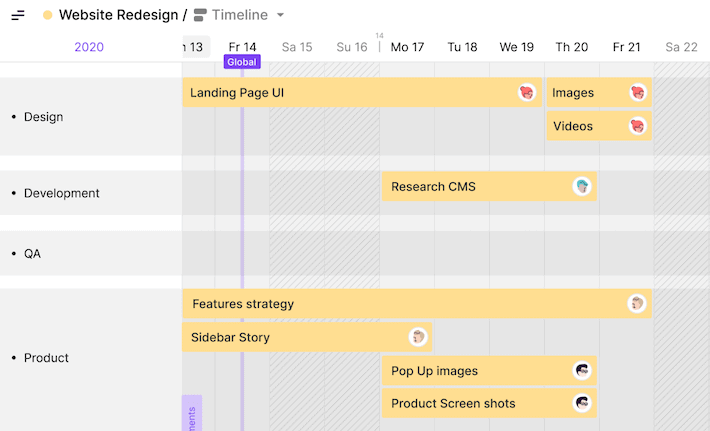
Toggl Plan is a beautifully simple timeline management tool for project teams.
Creating or updating a project management calendar with Toggl Plan is as simple as dragging and dropping tasks on the Project Timeline. And, you can even drag the task endpoints to change schedule dates.
You can assign tasks to one or more team members. Then, these team members can then collaborate using file attachments and comments. Besides, you can also add estimated hours to each task.
Adding milestones is easy too. Click on the date where you want to add a milestone. Then give it a name and set a color.
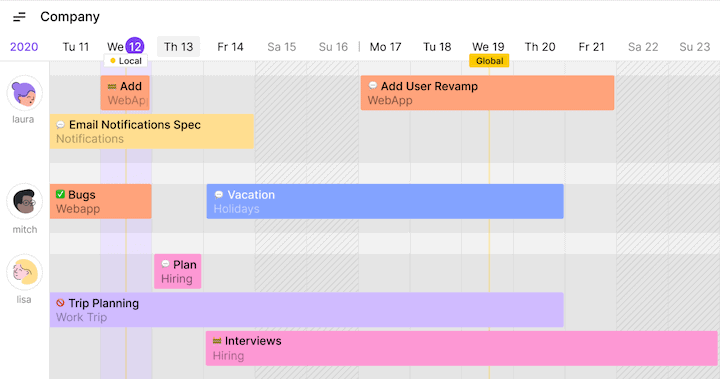
Toggl Plan’s Resource Calendar
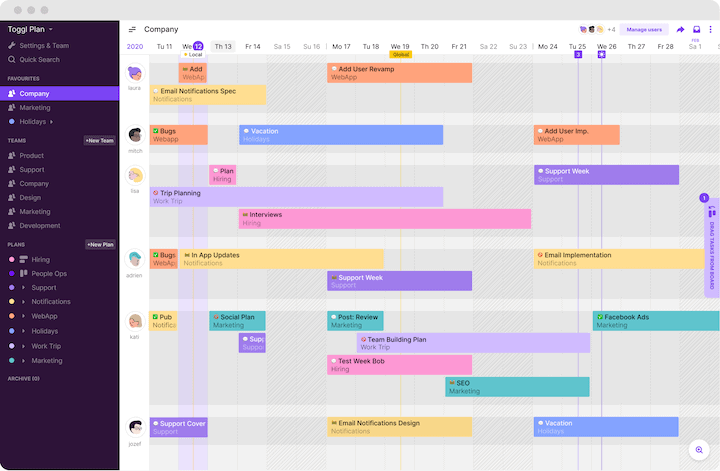
If you need a resource calendar, Toggl Plan’s Team Timelines are what you need.
Just like Project Timelines, you can create unlimited Team Timelines. And you can add any number of team members from within or outside your organization.
On the Team Timeline, you can see what projects and tasks each team member is working on. This way, you can quickly find and allocate available team members to a new project.
Plus, the Team Timeline also helps you see who’s over or underworked.
The best part is you can make changes to the schedule from both Plan and Team timelines. And changes are instantly reflected everywhere. Plus, relevant team members immediately get notifications about the changes.
Which Project Timeline Tool is right for you?
You can use many different tools — from spreadsheets to online applications — to create project management calendars. But which method and tool are the best for you?
The answer depends on what meets your needs and budgets.
Spreadsheets and Calendars are freely available. And most project tools, including Toggl Plan, have a free trial. Try all three methods and tools to see what works best for your team.
Get started for free with Toggl Plan.

Jitesh is an SEO and content specialist. He manages content projects at Toggl and loves sharing actionable tips to deliver projects profitably.
![Time and Materials Contracts: The Definitive Guide [+Template]](https://toggl.com/blog/wp-content/uploads/2023/09/time-materials-1-673x404.jpg)
