Making a well-designed project timeline can be your savior when you:
- Find it challenging to manage a project with multiple moving parts
- Miss deadlines because you’re waiting for something beyond your control (such as approvals, feedback, essential resources etc.)
- Struggle to track progress effectively
In this guide, we’ll take you through a step-by-step approach to creating a project timeline with ease.
Go directly to the steps, if you want to skip over the definition, example, and types of project timelines.
What is a project timeline?
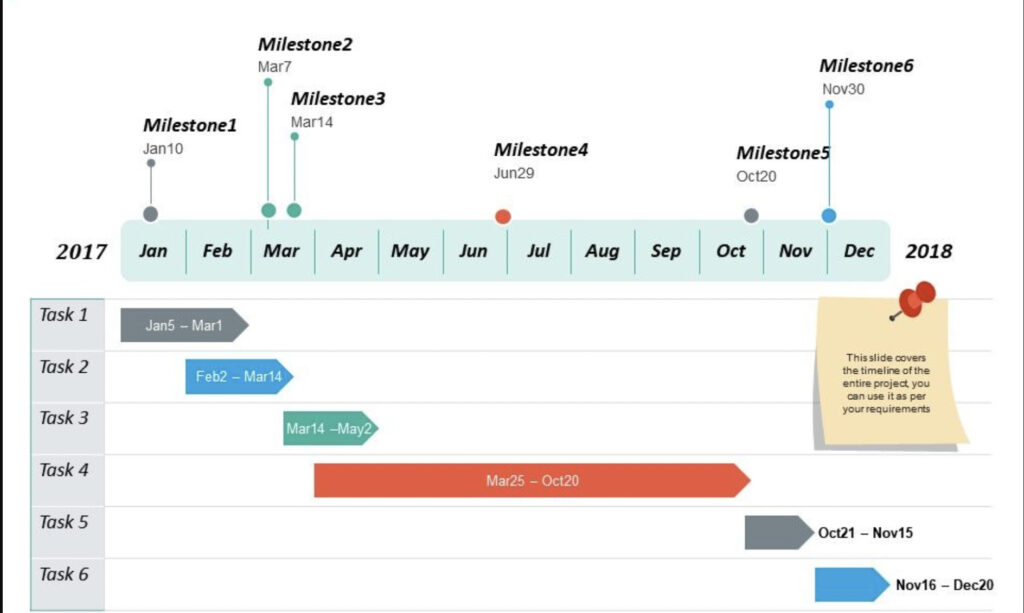
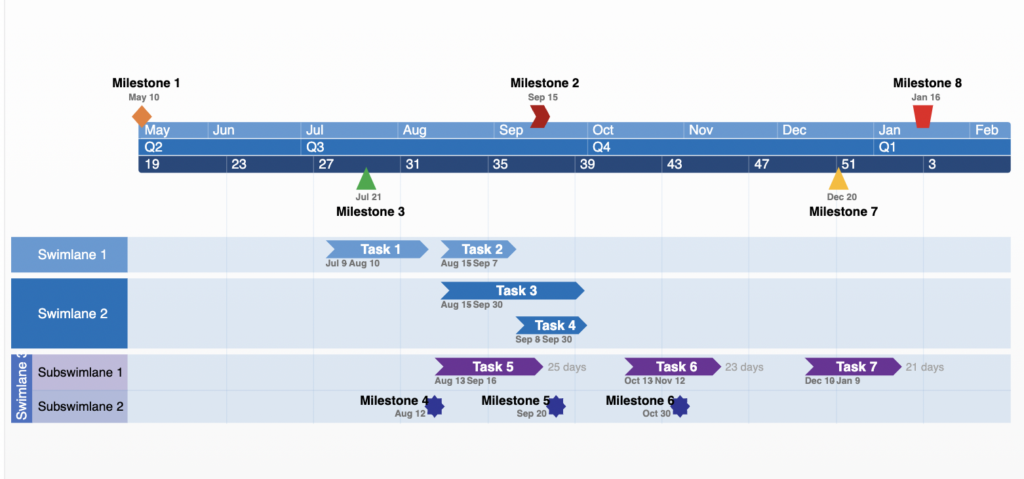
A project timeline is a graphical representation of a project’s schedule in the form of a horizontal bar chart.
The x-axis represents the project calendar. And each horizontal bar represents a project task. The ends of the horizontal bar indicate the start and end dates of the task.
From a project’s initiation to its end, a timeline shows the entire project life cycle. It’s a critical output of the project-planning process.
A timeline gives you an overview of:
- Tasks or activities with start and end dates
- Dependencies between tasks or activities
- Allocated resources for each task or activity
- Milestones such as project kick-off, completion of major deliverables, important meetings, or key decision points.
Project timeline example
Imagine you’re planning a marketing campaign for a new product launch. Let’s say it’s your brand-new dog apparel line.
Your project timeline includes milestones and tasks like:
- Setting goals
- Set goals and budget
- Determine KPIs
- Market research
- Conduct customer surveys
- Analyze competitor campaigns
- Identify target audience
- Create buyer persona(s)
- Campaign design
- Create ad copy
- Design ad collaterals
- Launch
- Run and monitor ads
In addition, you’ll also have kickoff and review meetings with stakeholders for approvals and progress reports.
To launch this campaign on time, you will need to schedule the tasks for specific start and end dates, considering:
- Task dependencies
- Your team’s availability and capacity
- Constraints and risks
With so many moving parts, things can quickly get out of hand even for this simple project. In addition, you must ensure that stakeholders are kept up to date and team members know who’s doing what and when.
That’s where a project timeline helps.
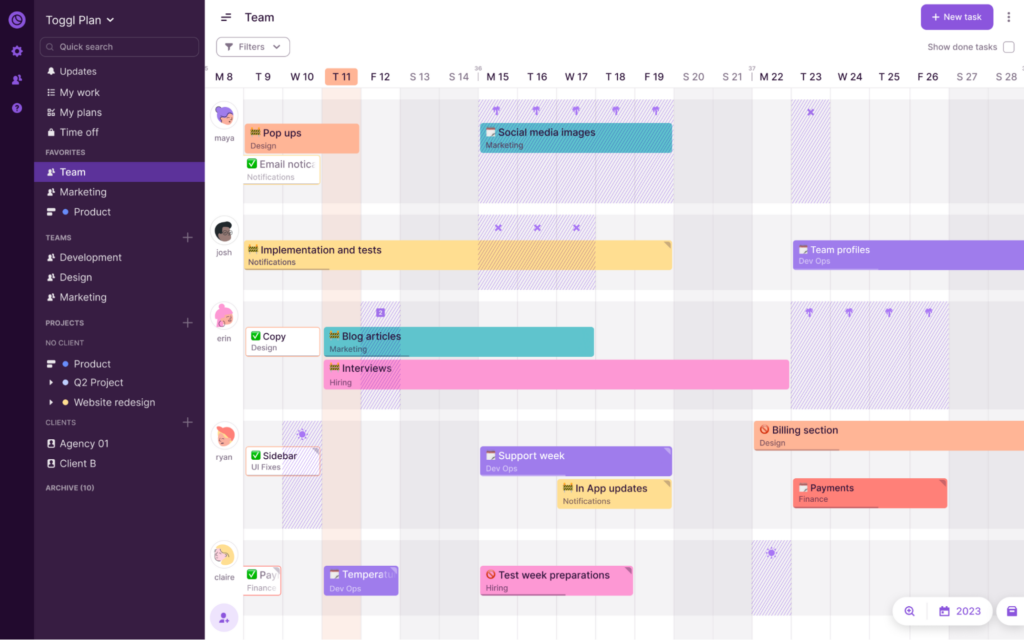
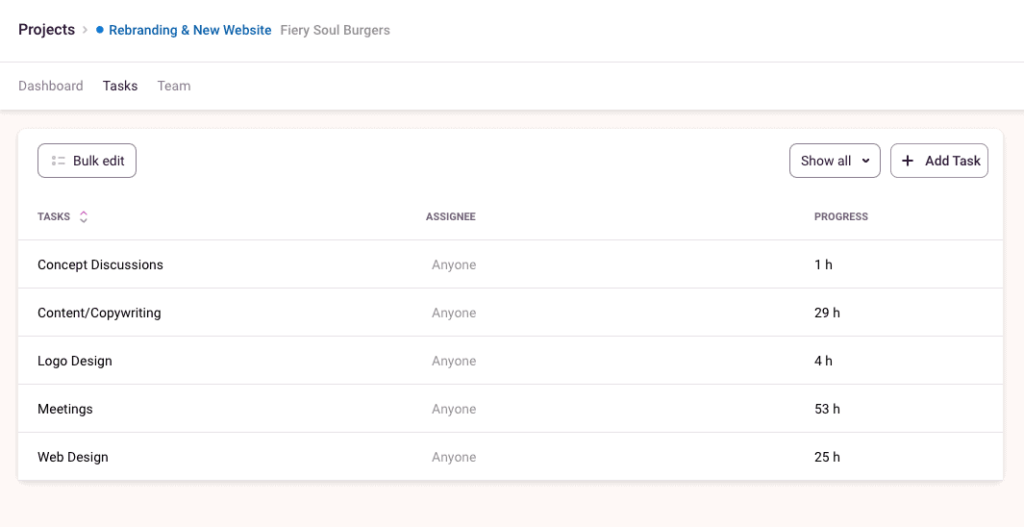
Take the above timeline as an example. It was created using Toggl Focus, which makes it easy for you to:
- Create and edit project schedules by dragging and dropping project timelines
- Share read-only versions of your project timelines with stakeholders
- Visualize and manage workloads, availability, and capacity.
- Keep track of important events by making project milestones visible across other timelines
Types of project management timelines
There are two major types of timelines — chronological timelines and Gantt charts. In addition, timelines can also be static or interactive.
Let’s take a look at a few examples:
Chronological project timelines
Chronological timelines can be horizontal or vertical.
They make it easy to visualize sequential activities; i.e., activities that occur one after another. This makes chronological timelines useful for very high-level project roadmaps.
Gantt chart project timelines
Unlike sequential timelines, Gantt charts can also be used for mapping out synchronous activities; i.e., activities that occur in parallel.
- We’ve already seen an example Gantt project timeline in the example above.
Static project timelines
Static timelines are often read-only timelines. You cannot interact with a static timeline or work collaboratively on it with your team. This makes it difficult to track a project’s progress in real time.
Static timelines are often designed using graphic design tools and presentation software.
Interactive project timelines
Unlike static timelines, interactive timelines make it easy to collaborate and track a project in real time. Also, you can easily adjust an interactive timeline if the project schedule changes.
Most modern project management tools come with an interactive Gantt chart timeline.
How to create a successful project timeline
Creating a timeline may seem simple.
But even if you’re a veteran project manager, these 8 steps will help you systematically create a timeline.
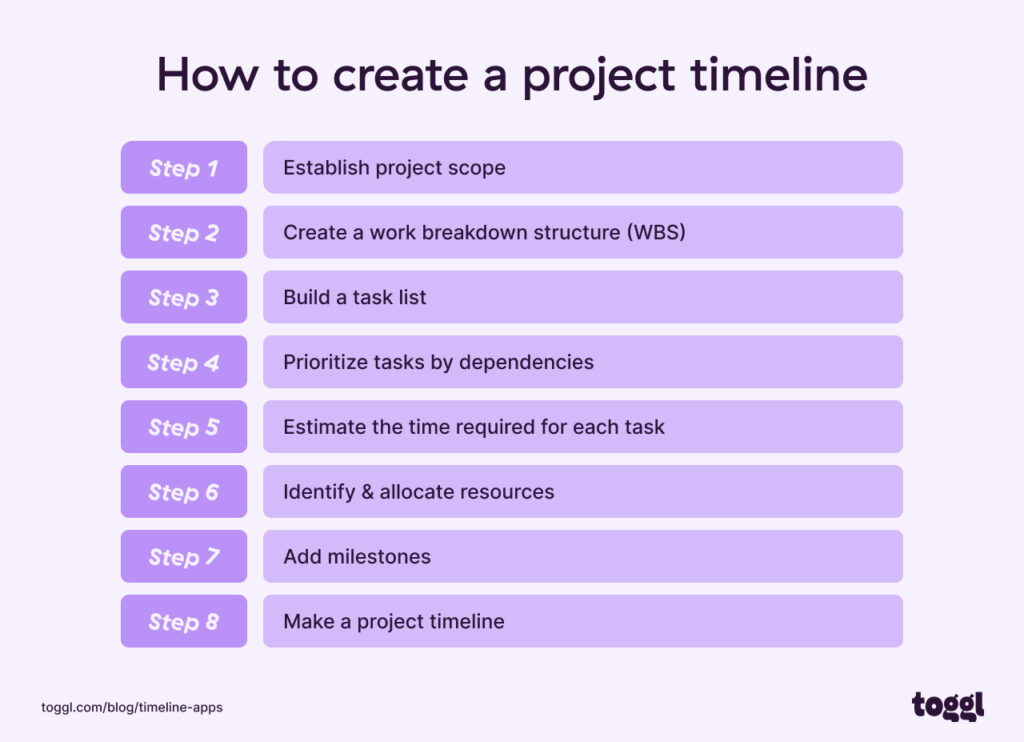
Let’s go!
Step #1: Establish project scope
A project scope statement freezes a project’s requirements, priorities, and constraints.
Essentially, it documents what’s included and what’s not included in a project.
If the project’s scope isn’t defined or approved by the client, chances are project owners may request deliverables outside the original requirements.
This is called scope creep.
As a result, projects fail because of poor delivery and result in unhappy clients and a burnt-out team.
This is why it’s critical to establish, document, and get the scope approved by the client.
Here’s a Project Scope template that will make that process easier for you.
Step #2: Establish the significant project phases or deliverables
Once you’ve established a project’s scope, the next step is to establish the significant project phases or deliverables.
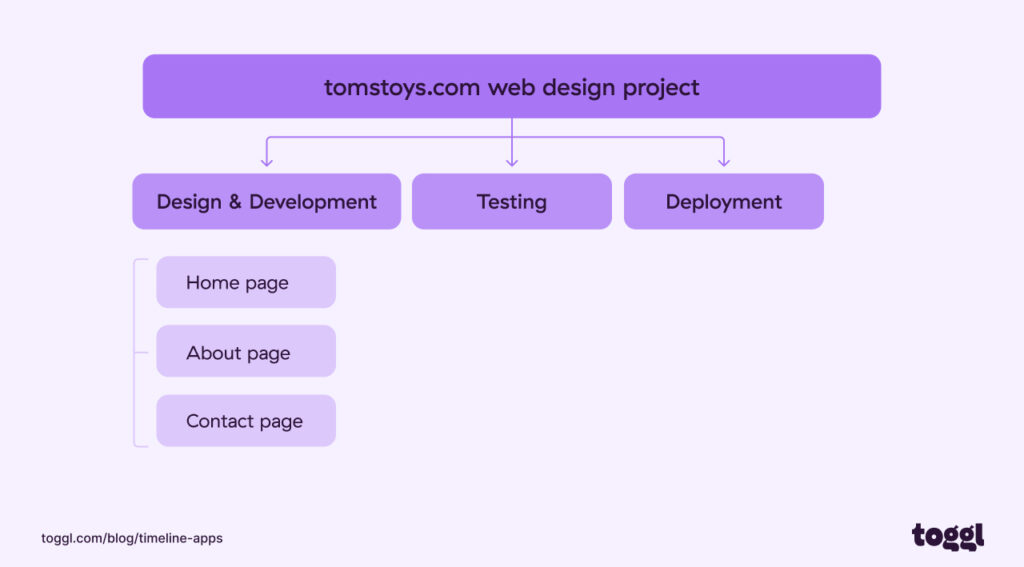
Creating a Work Breakdown Structure (WBS) can help you here.
A WBS is a step-by-step, tiered layout detailing all the work necessary to complete a project. The WBS effectively “breaks down” the project into manageable phases or deliverables, like in the image below.
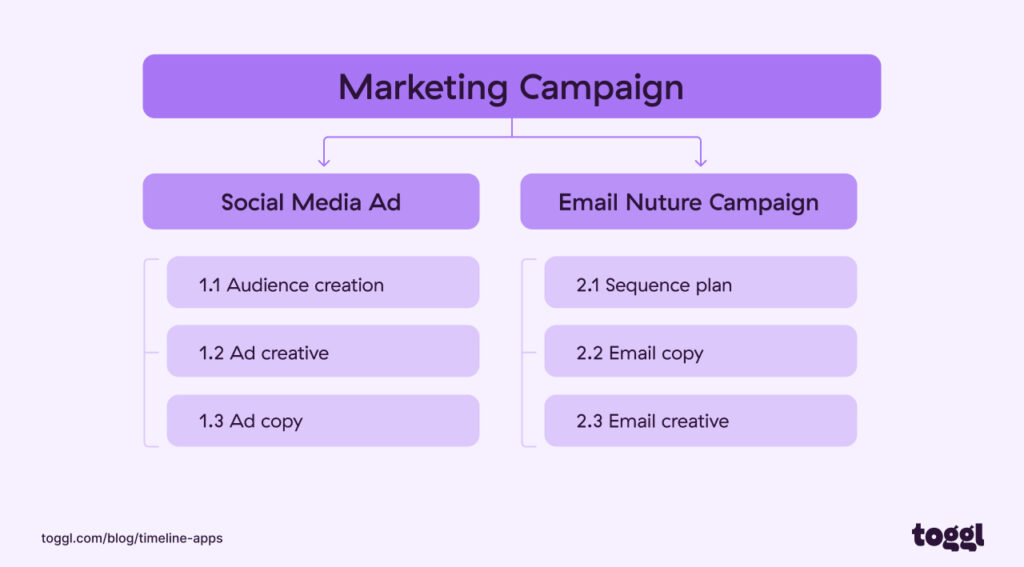
For example, a web design project can be split into phases like:
- Design
- Development
- Testing
- Deployment
However, we can execute some design and development activities simultaneously. So you could split the project deliverables into the following sub-deliverables:

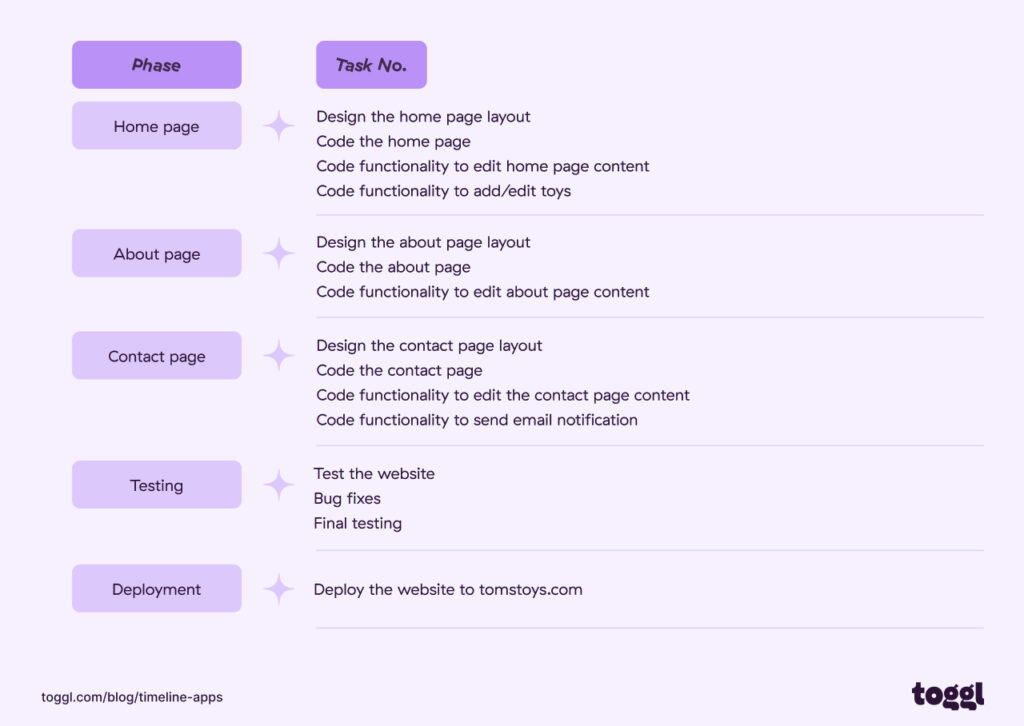
Step #3: Build a task list
Next, we split each phase or deliverable into tasks. Tasks are the activities that you need to execute on to complete each phase or deliverable..
When splitting breaking down phases or deliverables into tasks, ensure the tasks are neither too big nor too small.
Why?
Large tasks can make estimation hard and carry significant risks. On the other hand, small tasks require micromanagement and waste a manager’s time.
At the end of this exercise, you should have a list of tasks needed to complete each phase or deliverable..
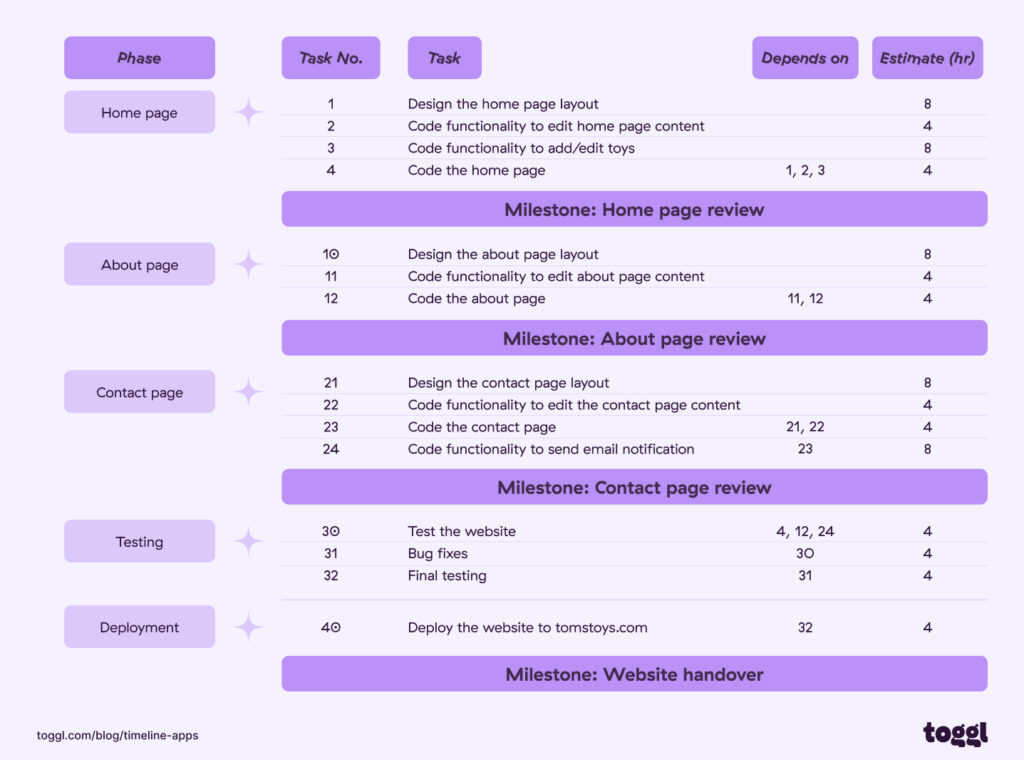
Here’s a task list for our example website design project:
Step #4: Prioritize tasks by dependencies
A dependent task cannot start until prior tasks, on which it depends, are completed.
Identifying task dependencies helps you discover tasks that need to be worked on in a sequence.
Creating a realistic timeline critically depends on prioritizing tasks by dependencies.
You should start tasks that depend on others after completing the prior ones, as this determines a work sequence.
On the other hand, you can work on independent tasks in parallel.
For our web design project, it’s fairly easy to identify dependencies to prioritize work.
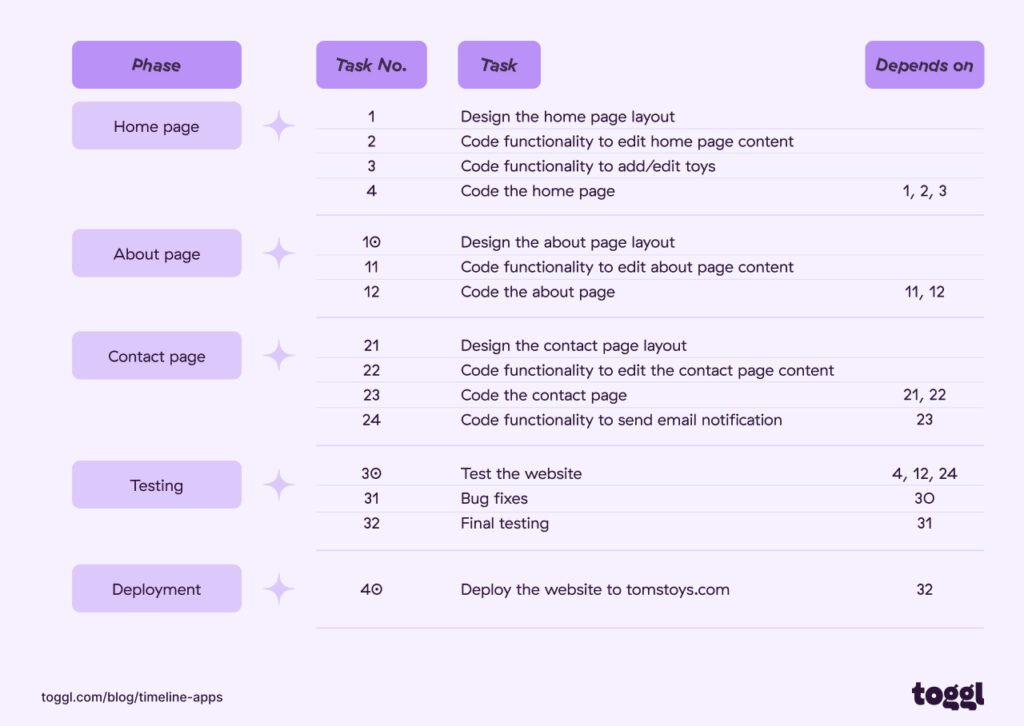
The task IDs in a WBS essentially create the work sequence.
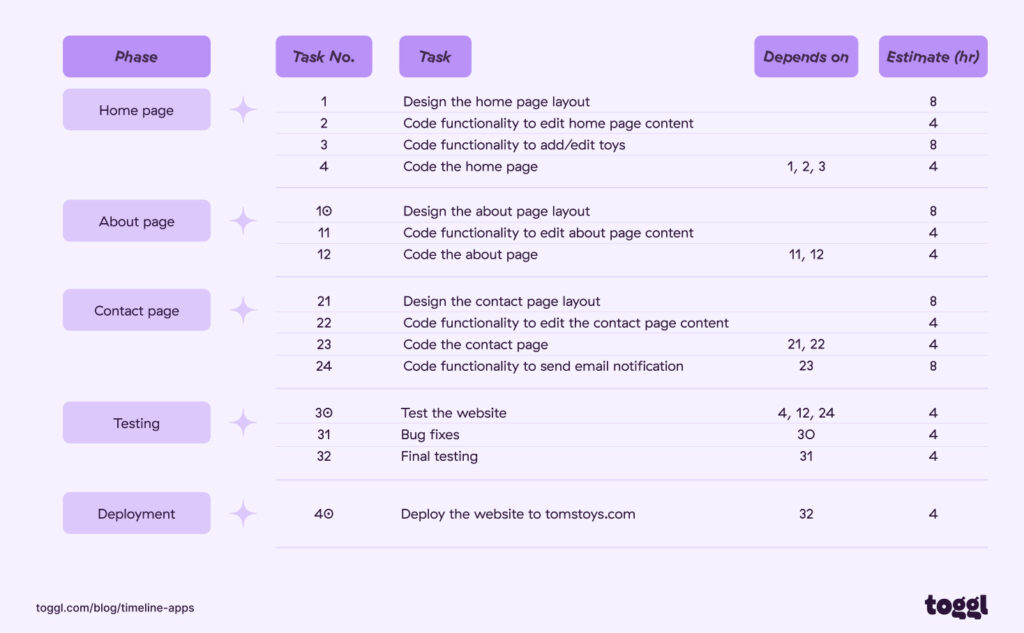
Step #5: Estimate the time required for each task
Once your task list is prioritized by dependencies, the next step is to estimate the time required to complete each task.
You have two options here:
- Use the knowledge and experience of your team
- Use historical project data for more accurate estimates
You can ask your team to add time estimates to each task on your WBS.
Here’s how our website design project task list looks with estimates:
Or if you have the data look at past projects to better understand how much time went into each task.
Using Toggl Track, you can view past project data within the Project Dashboard:
If you’re unsure about the granularity of each phase or deliverable, consider using the 8/80 rule.
This guideline suggests that a task’s duration should be 8 to 80 hours. When in doubt, apply the “if it makes sense” rule and use your best judgment.
When estimating the effort required, add a small buffer so that your team has some breathing space before the final deadline.

Step #6. Identify & allocate resources
Next, you need to identify what resources are available to complete the project.
Resource availability and capacity planning are often the biggest limiting factors when scheduling tasks.
This is particularly true for project team members who are shared across multiple projects.
Toggl Focus’ Team Timeline is color-coded with different colors for each project. This helps you quickly visualize your team’s capacity and workload.
Within your Team Timeline, you can also get a quick look over the availability of team members over a specified period using the Availability overview.
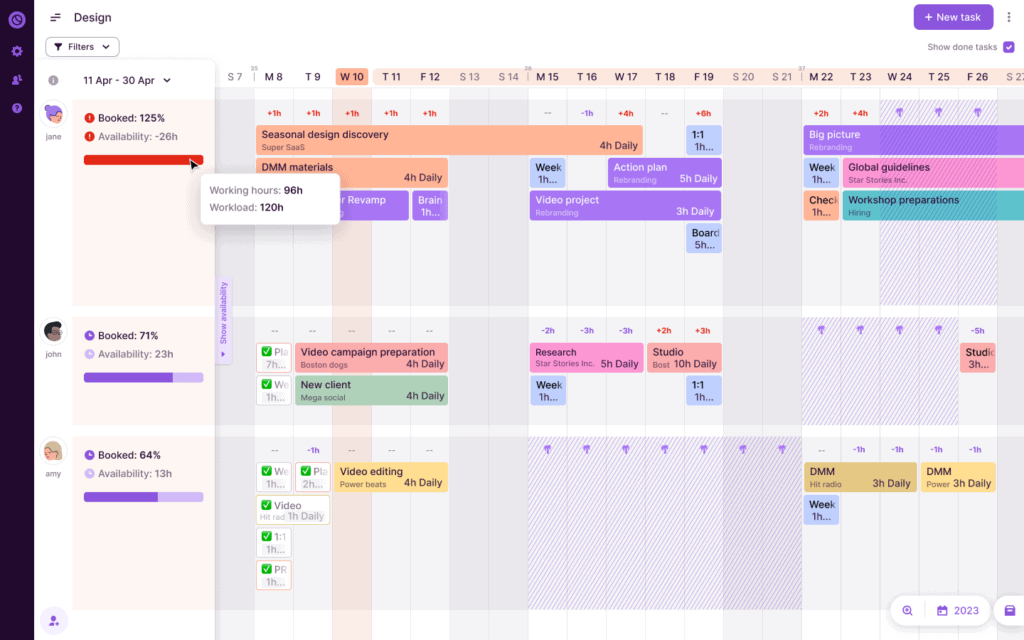
Once you know your team’s availability and capacity, you can easily adjust workloads to accommodate other projects by dragging and dropping work.


Step #7: Add milestones
Project milestones are critical dates such as the completion of major deliverables, important meetings, or key decision points. Typically, a milestone marks the end of a project phase or cycle.
On the timeline, milestones serve as intermittent checkpoints to monitor progress and get feedback from clients.
Milestones help you adjust the schedule if estimates go awry.
Plus, client feedback on milestone deliverables helps your team correct course to meet client expectations.
Finally, delivery milestones are a reason to celebrate and help your team stay motivated throughout the project’s duration.
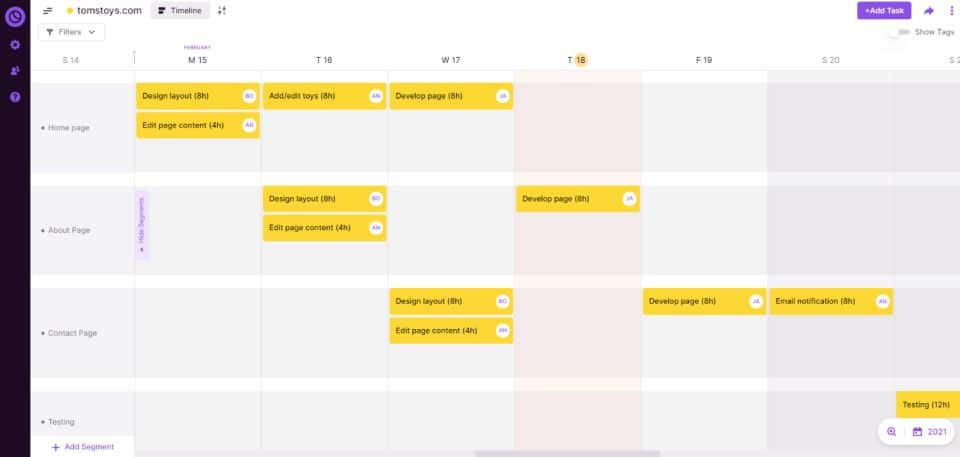
For our web design project, here are some example milestones.
Step #8: Make a project timeline
Finally, it’s time to make a project timeline.
To create a timeline, you can use something as simple as paper and pen or a project timeline software tool to create interactive timelines.
Here’s a project timeline example for a web design project in Toggl Focus.
Now you’re probably wondering if you should go through the trouble of creating a project timeline in the first place. 🤔
Let’s go over the benefits you can harness by leveraging this visual approach.
You’ll see it’s worth the effort.
What are the benefits of creating a project timeline?
There can be no debate that planning better makes work better. Project management research has shown that planning and project success are closely related.
Here are a few reasons why you should consider making a timeline:
- Communicates the project plan visually in detail. A project management timeline provides a visual overview of a project. It also provides details about the project’s tasks, resources, milestones, and delivery dates.
- Tracks and communicates project progress. As tasks get done, you can all see how far the project has come. Also, you can see if the project is on track to meet the milestones and delivery dates.
- Motivates the team to deliver. Nothing is more motivating than seeing tasks get done, milestones being met, and the project progressing. A timeline motivates the team and helps it stay on track.
- Helps prioritize project activities. A timeline gives clear visibility into the dependencies within a project. That way your team and all stakeholders can clearly see what needs to be prioritized.
- Reveals constraints and risks. Finding the right resources at the right time is critical to a project’s success. A timeline helps identify resource availability as well as risks that can derail the project.
Challenges in creating a project management timeline
Based on the steps above, there are 3 major challenges you’ll encounter when creating a timeline for a project.
- Insufficient project information: No project can succeed with insufficient information. That’s why it’s critical to freeze the project scope and get it approved before you begin planning and execution. It also helps to communicate frequently with clients at each stage of the project.
- Estimation: Timeline planning often stumbles during the estimation step. However, keep in mind that an estimate is just that, an estimate. It’s difficult to estimate how long it’ll take to complete a task. There are a lot of factors involved – task complexity, resource availability, resource competency, etc.
- Resource availability: Managing resources is possibly the biggest limiting factor, particularly if teams share resources. A project manager should book a resource, not just for the estimated time, but also for a buffer period before or after the actual scheduled task.
Also, your job isn’t done once you’ve created the timeline. To ensure that the project is completed within budget and on time, you’ll need to avoid these 5 mistakes.
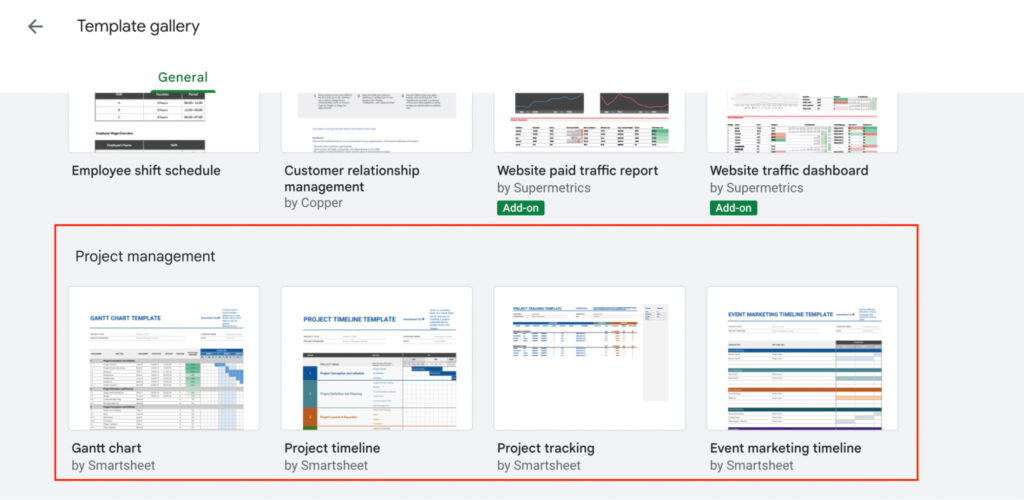
3 project timeline templates to help you plan better
If you’re managing a project, having a solid, detailed timeline is crucial to ensure its success. Fortunately, there are many tools available that can help you create one.
Let’s take a look at 3 of them and what they can do for you:
Excel project timeline template
Excel offers a variety of pre-designed templates that you can customize easily.

With Excel, you can create both simple chronological timelines and Gantt charts, which help schedule and track tasks and milestones.
Excel is generally available to most teams and has almost no learning curve. However, collaboration and keeping it up to date in real time can be challenging.
Google Sheets project timeline template
Google Sheets is an alternative to creating Excel project timelines
There are several templates available online that make it easy to get started with your project timeline in Google Sheets.
Google Sheets has the same pros and cons as that of Excel.
Get this project timeline template: You can find this template in the “Project management” section of Google Sheets templates.
PowerPoint project timeline template
PowerPoint is a popular choice among project managers.
To create a project timeline, open a blank presentation and select the “SmartArt” option under the “Insert” tab.
From there, you can choose from various pre-designed templates that suit your project goals.
Once you’ve selected the appropriate template, input your specific tasks or milestones into each box.
You can easily adjust time frames by dragging and dropping them to fit within your desired scope of the project.
How to get this template: Here’s where you want to search for it!
Powerpoint timelines are static. It’s challenging to keep them up to date in real time.
Now over to you
Creating a project timeline is critical to the success of any project.
It helps you streamline tasks, meet deadlines, and track progress on key milestones.
By following the step-by-step process outlined in this article and using tools like flowcharts, Gantt charts, and project management software integrations, you can create an effective project timeline that matches the scope of your project goals.
You can also try Toggl Focus for free and let it help you successfully manage even the most complex projects – from start to finish!
Frequently Asked Questions (FAQs)
Let’s take a look at a couple of frequently asked questions:
Q1. What’s the difference between a project timeline and a project schedule?
Project schedules focus on mapping out individual tasks by breaking down the work into smaller parts over time according to methodology or scope of the project, while project timelines provide an overview of all aspects of the project and help you understand how everything fits together in a cohesive flowchart, which helps streamline teamwork.
Q2. What’s the difference between a project timeline and a Gantt chart?
Project timelines are a visual representation of the chronological order of tasks, subtasks, and major milestones that must be completed within a specific time frame to achieve desired goals. Gantt charts, on the other hand, give you better insight into complex projects. They provide an overview of all the tasks involved in completing a project and their interdependencies.
Q3. How do I create a project timeline in Excel?
Open Excel and create a new workbook. Select the start date for your project and enter it in cell A1. In column B, enter the task that must be completed first. In column C, enter the duration of each task, and calculate the end date for each task by adding the duration to the start date!
Q4. How do I create a project timeline in Word?
Creating a project timeline in Word is another option for those who prefer to work with Microsoft Office products. Start by creating a table or using SmartArt graphics to visualize your tasks, then add dates for each task to identify possible bottlenecks and delays along the way.

Work tools to elevate your productivity – apps for incredibly simple time tracking and effective project planning.